

在springboot中调用openai Api并实现流式响应
之前在《在springboot项目中调用openai API及我遇到的问题》这篇博客中,我实现了在springboot中调用openai接口,但是在这里的返回的信息是一次性全部返回的,如果返回的文字比较多,我们可能需要等很久。 所以需要考虑将请求接口响应方式改为流式响应。
目录
openai api文档
码代码!!!
配置
properties
pom文件
1.请求体类
请求体中的信息类
2.响应类
1)响应体主体类
2)Delta类
常量池类
客户端类
websocket后端配置
1)websocket配置类
2)websocket类
ai消息工具类
页面
看结果
openai api文档
查阅openai的api文档,文档中说我们只需要在请求体中添加"stream":true就可以实现流式响应了。
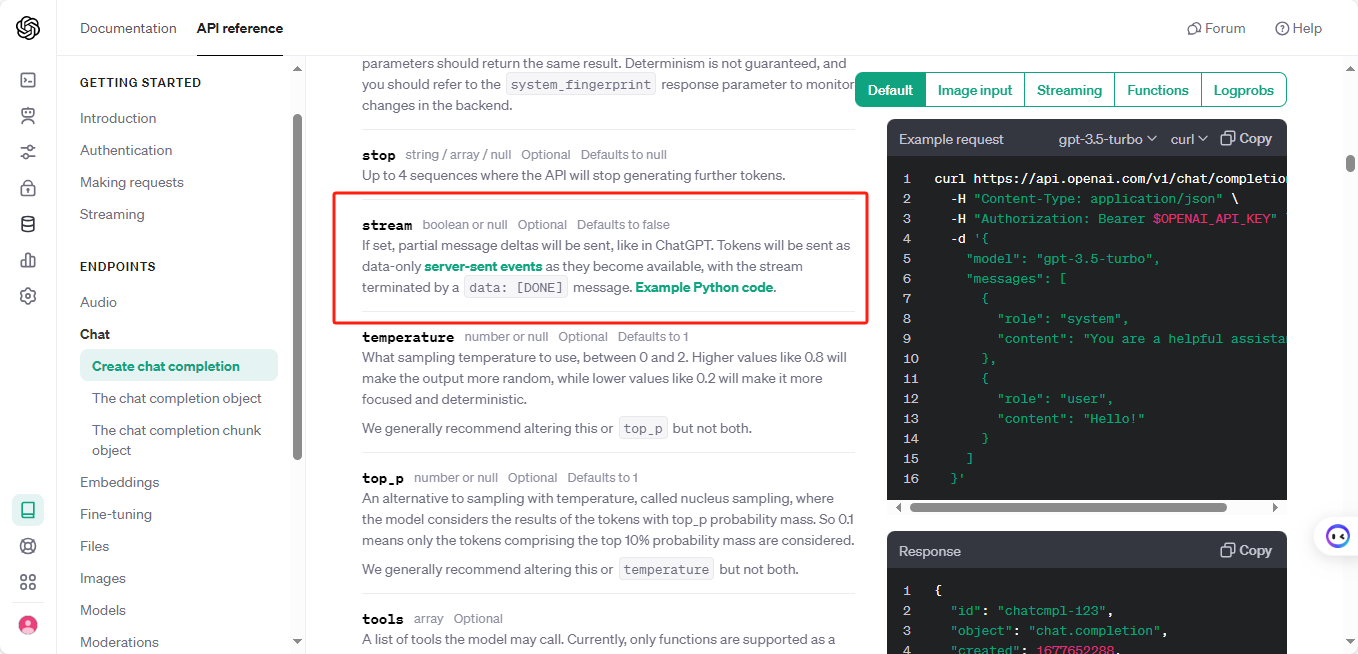
文档中还说当返回值为data: [DONE]时,标识响应结束。
码代码!!!
跟之前一样,为了缩减篇幅,set、get、构造器都省略
配置
properties
openai.key=你的key
openai.chatgtp.model=gpt-3.5-turbo
openai.gpt4.model=gpt-4-turbo-preview
openai.chatgtp.api.url=/v1/chat/completions
pom文件
我们在项目中引入websocket和webflux 之前使用的RestTemplate并不擅长处理异步流式的请求。所以我们改用web flux。
			org.springframework.boot
			spring-boot-starter-websocket


			org.springframework.boot
			spring-boot-starter-webflux
请求体类
public class ChatRequest {
    // 使用的模型
    private String model;
    // 历史对话记录
    private List messages;
    private Boolean stream = Boolean.TRUE;
    @Override
    public String toString() {
        try {
            return ConstValuePool.OBJECT_MAPPER.writeValueAsString(this);
        } catch (JsonProcessingException e) {
            throw new RuntimeException(e);
        }
    }
}
请求体中的信息类
public class ChatMessage {
    // 角色
    private String role;
    // 消息内容
    private String content;
}
响应类
响应类先看接口的返回格式的示例吧。下面json中的content就是本次响应数据
{
  "id": "chatcmpl-8uk7ofAZnSJhsHlsQ9mSYwFInuSFq",
  "object": "chat.completion.chunk",
  "created": 1708534364,
  "model": "gpt-3.5-turbo-0125",
  "system_fingerprint": "fp_cbdb91ce3f",
  "choices": [
    {
      "index": 0,
      "delta": {
        "content": "吗"
      },
      "logprobs": null,
      "finish_reason": null
    }
  ]
}
根据json格式,我们构造响应体类如下
1)响应体主体类
public class ChatResponse {
    private String id;
    private String object;
    private Long created;
    private String model;
    private String system_fingerprint;
    // GPT返回的对话列表
    private List choices;
    public static class Choice {
        private int index;
        private Delta delta;
        private Object logprobs;
        private Object finish_reason;
    }
}
2)Delta类
public class Delta {
    private String role;
    private String content;
}
常量池类
public class ConstValuePool {
    // openai代理客户端
    public static WebClient PROXY_OPENAI_CLIENT = null;
}
客户端类
客户端一样还是在钩子函数中生成。
@Component
public class ApiCodeLoadAware implements EnvironmentAware, ApplicationContextAware {
    Environment environment;
    @Override
    public void setEnvironment(Environment environment) {
        this.environment = environment;
    }
    @Override
    public void setApplicationContext(ApplicationContext applicationContext) throws BeansException {
        // chatgpt、gpt4
        HttpClient httpClient = HttpClient.create().proxy(clientProxy ->
                clientProxy.type(ProxyProvider.Proxy.HTTP) // 设置代理类型
                        .host("127.0.0.1") // 代理主机
                        .port(7890)); // 代理端口
        ConstValuePool.PROXY_OPENAI_CLIENT = WebClient.builder()
                .clientConnector(new ReactorClientHttpConnector(httpClient))
                .baseUrl("https://api.openai.com")
                .defaultHeader("Authorization", "Bearer " + environment.getProperty("openai.key"))
                .build();
    }
}
websocket后端配置
webscoekt具体可以看我之前的博客使用websocket实现服务端主动发送消息到客户端
1)websocket配置类
@Configuration
public class WebsocketConfig {
    @Bean
    public ServerEndpointExporter getServerEndpointExporter() {
        return new ServerEndpointExporter();
    }
}
2)websocket类
这里的参数id是为了区分具体是那个websocket需要推送消息,可以通过登录等方式提供给用户
@Component
@ServerEndpoint("/aiWebsocket/{id}")
public class AiWebsocketService {
    private final Logger logger = LoggerFactory.getLogger(AiWebsocketService.class);
    private Session session;
    //存放所有的websocket连接
    private static Map aiWebSocketServicesMap = new ConcurrentHashMap();
    //建立websocket连接时自动调用
    @OnOpen
    public void onOpen(Session session,@PathParam("id") String id){
        this.session = session;
        aiWebSocketServicesMap.put(id, this);
        logger.debug("有新的websocket连接进入,当前连接总数为" + aiWebSocketServicesMap.size());
    }
    //关闭websocket连接时自动调用
    @OnClose
    public void onClose(){
        aiWebSocketServicesMap.remove(this);
        logger.debug("连接断开,当前连接总数为" + aiWebSocketServicesMap.size());
    }
    //websocket接收到消息时自动调用
    @OnMessage
    public void onMessage(String message){
        logger.debug("this:" + message);
    }
    //通过websocket发送消息
    public void sendMessage(String message, String id){
        AiWebsocketService aiWebsocketService = aiWebSocketServicesMap.get(id);
        if (aiWebsocketService == null) {
            return;
        }
        try {
            aiWebsocketService.session.getBasicRemote().sendText(message);
        } catch (IOException e) {
            logger.debug(this + "发送消息错误:" + e.getClass() + ":" + e.getMessage());
        }
    }
}
ai消息工具类
@Component
public class ChatGptModelService implements AiModelService{
    private static final Logger logger = LoggerFactory.getLogger(ChatGptModelService.class);
    @Value("${openai.chatgtp.api.url}")
    private String uri;
    @Value(("${openai.chatgtp.model}"))
    private String model;
    @Resource
    private AiWebsocketService aiWebsocketService;
    @Override
    public String answer(String prompt, HttpServletRequest request) throws InterruptedException {
        HttpSession session = request.getSession();
        String identity = AiIdentityFlagUtil.getAiIdentity(request);
        // 获取历史对话列表,chatMessages实现连续对话、chatDialogues便于页面显示
        List chatMessages = (List) session.getAttribute(ConstValuePool.CHAT_MESSAGE_DIALOGUES);
        List chatDialogues = (List) session.getAttribute(ConstValuePool.CHAT_DIALOGUES);
        if (chatMessages == null) {
            chatMessages = new ArrayList();
            chatMessages.add(ChatMessage.createSystemDialogue("You are a helpful assistant."));
            chatDialogues = new ArrayList();
            session.setAttribute(ConstValuePool.CHAT_DIALOGUES, chatDialogues);
            session.setAttribute(ConstValuePool.CHAT_MESSAGE_DIALOGUES, chatMessages);
        }
        chatMessages.add(new ChatMessage("user", prompt));
        chatDialogues.add(AiDialogue.createUserDialogue(prompt));
        ChatRequest chatRequest = new ChatRequest(this.model, chatMessages);
        logger.debug("发送的请求为:{}",chatRequest);
        Flux chatResponseFlux = ConstValuePool.PROXY_OPENAI_CLIENT
                .post()
                .uri(uri)
                .contentType(MediaType.APPLICATION_JSON)
                .bodyValue(chatRequest.toString())
                .retrieve()
                .bodyToFlux(String.class);// 得到string返回,便于查看结束标志
        StringBuilder resultBuilder = new StringBuilder();
        // 设置同步信号量
        Semaphore semaphore = new Semaphore(0);
        chatResponseFlux.subscribe(
                value -> {
                    logger.debug("返回结果:{}", value);
                    if ("[DONE]".equals(value)) {
                        return;
                    }
                    try {
                        ChatResponse chatResponse = ConstValuePool.OBJECT_MAPPER.readValue(value, ChatResponse.class);
                        List choices = chatResponse.getChoices();
                        ChatResponse.Choice choice = choices.get(choices.size() - 1);
                        Delta delta = choice.getDelta();
                        String res = delta.getContent();
                        if (res != null) {
                            resultBuilder.append(res);
                            aiWebsocketService.sendMessage(resultBuilder.toString(), identity);
                        }
                    } catch (JsonProcessingException e) {
                        throw new AiException("chatgpt运行出错",e);
                    }
                }, // 获得数据,拼接结果,发送给前端
                error -> {
                    semaphore.release();
                    throw new AiException("chatpgt执行出错",error);
                    }, // 失败释放信号量,并报错
                semaphore::release// 成功释放信号量
        );
        semaphore.acquire();
        String resString = resultBuilder.toString();
        logger.debug(resString);
        chatDialogues.add(AiDialogue.createAssistantDialogue(resString));
        chatMessages.add(ChatMessage.createAssistantDialogue(resString));
        // 对话轮数过多删除最早的历史对话,避免大量消耗tokens
        while (chatMessages.size() > ConstValuePool.CHAT_MAX_MESSAGE) {
            chatMessages.remove(0);
        }
        return "";
    }
}
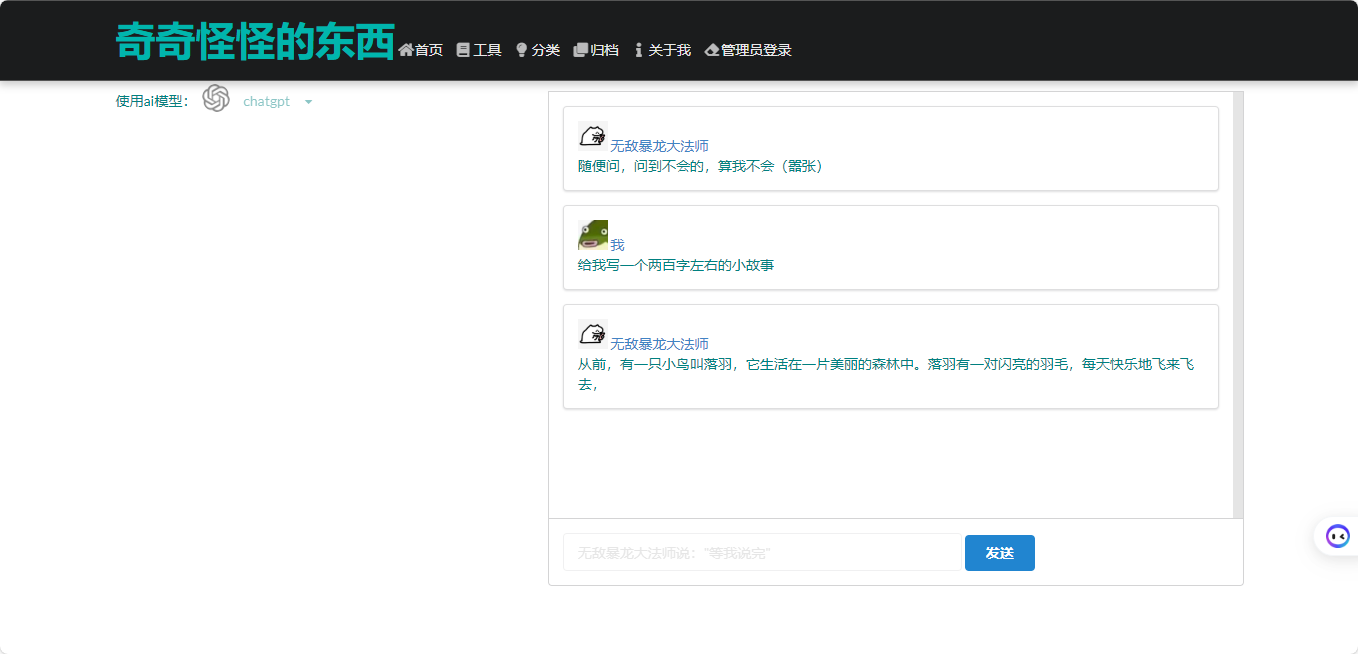
页面
因为我的前端写的不太好,就不展示前端代码了
看结果
能够实现

文章版权声明:除非注明,否则均为主机测评原创文章,转载或复制请以超链接形式并注明出处。
")
")
")

还没有评论,来说两句吧...