

Vue3+Vue-Router+Element-Plus根据后端数据实现前端动态路由——权限管理模块
提示:文章内容仔细看一些,或者直接粘贴复制,效果满满

(图片来源网络,侵删)
文章目录
- 前言
- 一、技术栈
- 二、项目结构
- 三、菜单组件和数据
- 1、AsideMenu.vue 组件
- 2、LeftSubMenu.vue
- 3、menuData.json 数据
- 四、router 配置
- 1、router/index.js
- 2、permission.js (与main.js 同级)
- 3、main.js
- 五、效果
- 六、给个点赞和收藏
- 七、参考文献
前言
提示:文章大概
1、项目:前后端分离
2、前端:基于Vite创建的Vue3项目
3、后端:没有,模拟的后端数据
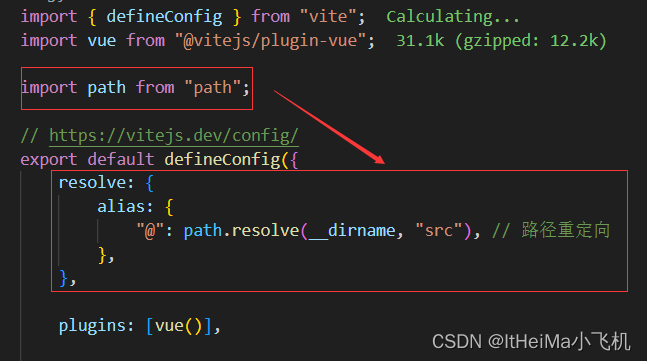
4、关于路径“@”符号——vite.config.js 文件里修改
 (图片来源网络,侵删)
提示:以下是本篇文章正文内容,下面案例可供复制粘贴使用,嘎嘎爽
一、技术栈
- Vite 创建 Vue3 项目
# 1.创建项目
npm create vite@latest
# 2.下载依赖
npm install
# 3.运行项目
npm run dev
- Element-plus
# 1.下载 npm install element-plus --save # 2.main.js 引入 // main.ts import { createApp } from 'vue' import ElementPlus from 'element-plus' import 'element-plus/dist/index.css' import App from './App.vue' const app = createApp(App) app.use(ElementPlus) app.mount('#app')- Vue-Router
# 1.安装
npm install vue-router@4
- nprogress (进度条——非必选,好看而已)
npm i nprogress -S

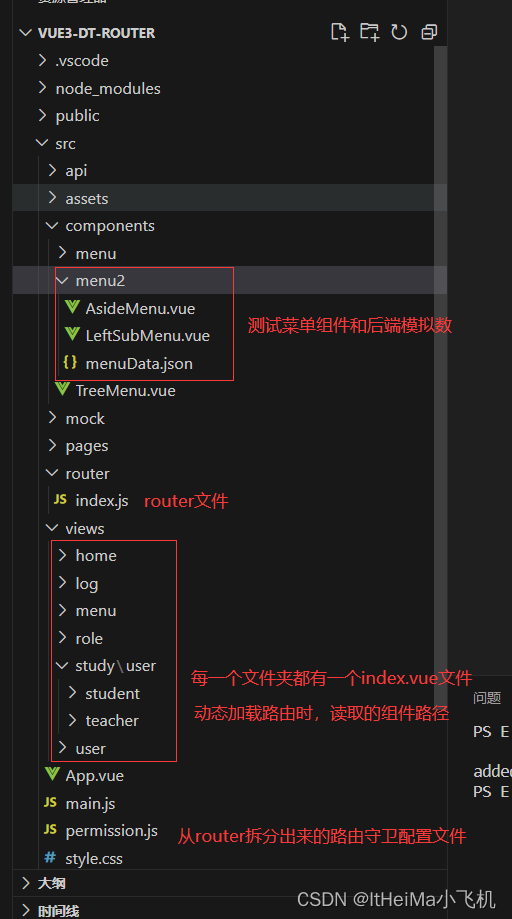
二、项目结构
三、菜单组件和数据
说明:
- AsideMenu.vue 引用 LeftSubMenu.vue 组件,并父传子传入后端数据
- LeftSubMenu.vue 组件加载数据
- menuData.json 后端模拟数据文件
1、AsideMenu.vue 组件
代码如下(示例):
import LeftSubMenu from "./LeftSubMenu.vue";
import { computed } from "vue";
import { useRouter } from "vue-router";
import treeMenu from './menuData.json';
const openedsArr = treeMenu.map((item) => {
    return item.path;
});
const activeMenu = computed(() => {
    const router = useRouter();
    const { meta, path } = router.currentRoute.value;
    if (meta.matchPath2) {
        return meta.matchPath2;
    } else {
        return path;
    }
});


.menu-left {
    flex: 1;
    padding: 0 8px;
    border-right: none;
    background: none;
}
.menu-left:deep(.el-menu),
.menu-left:deep(.el-sub-menu__title:hover) {
    background: none;
}
.menu-left:deep(.el-menu-item),
.menu-left:deep(.el-sub-menu__title) {
    height: 36px;
    margin-bottom: 4px;
    border-radius: 4px;
    color: var(--text-main-color) !important;
}
.menu-left:deep(.el-menu-item:hover .icon),
.menu-left:deep(.el-menu-item.is-active .icon) {
    filter: invert(100%);
    -webkit-filter: invert(100%);
}
.menu-left:deep(.el-menu-item:hover),
.menu-left:deep(.el-menu-item.is-active) {
    color: #ffffff !important;
    background-color: #eecece;
}
2、LeftSubMenu.vue
代码如下(示例):
(图片来源网络,侵删){{ item.meta.title }} {{ item.meta.title }} import LeftSubMenu from "./LeftSubMenu.vue"; import { computed, onMounted } from "vue"; import { useRouter } from "vue-router"; const props = defineProps({ menuData: { type: Array, default: [], }, }); onMounted(() => { console.log(props.menuData, "Item打印数据"); }); const curRoute = computed(() => { const router = useRouter(); const { path } = router.currentRoute.value; return path; });3、menuData.json 数据
数据参数说明:
- menuType: 0为菜单组,1为菜单(可跳转)
- children: 子路由
数据说明:不复制
{
        "id": "1",   // 唯一id
        "name": "Home",  // 组件名称
        "path": "/home",  // 路由
        "component": "/home/index.vue",   // 组件文件位置
        "menuType": "1",  // 组件类型
        "icon": "Discount",  // 图标
        "sort": 0,   // 排序规则
        "meta": {
            "title": "系统首页",  // 组件名称
            "requiresAuth": null, // 是否需要身份验证
            "roles": [],  // 用户角色或权限
            "breadcrumb": [  // 定义面包屑导航
                {}
            ],
            "keepAlive": null  // 是否需要缓存
        },
        "children": []   // 子路由
    }
代码如下(示例):
[
    {
        "id": "1",
        "name": "Home",
        "path": "/home",
        "component": "/home/index.vue",
        "menuType": "1",
        "icon": "Discount",
        "sort": 0,
        "meta": {
            "title": "系统首页",
            "requiresAuth": null,
            "roles": [],
            "breadcrumb": [
                {}
            ],
            "keepAlive": null
        },
        "children": []
    },
    {
        "id": "2",
        "name": "System",
        "path": "/system",
        "component": "/system/index.vue",
        "menuType": "0",
        "icon": "Operation",
        "sort": 0,
        "meta": {
            "title": "系统管理",
            "requiresAuth": null,
            "roles": [],
            "breadcrumb": [
                {}
            ],
            "keepAlive": null
        },
        "children": [
            {
                "id": "211",
                "name": "User",
                "path": "/user",
                "component": "/user/index.vue",
                "menuType": "1",
                "icon": "user",
                "sort": 0,
                "meta": {
                    "title": "用户管理",
                    "requiresAuth": null,
                    "roles": [],
                    "breadcrumb": [
                        {}
                    ],
                    "keepAlive": null
                },
                "children": []
            },
            {
                "id": "222",
                "name": "Menu",
                "path": "/menu",
                "component": "/menu/index.vue",
                "menuType": "1",
                "icon": "Menu",
                "sort": 0,
                "meta": {
                    "title": "菜单管理",
                    "requiresAuth": null,
                    "roles": [],
                    "breadcrumb": [
                        {}
                    ],
                    "keepAlive": null
                },
                "children": []
            },
            {
                "id": "223",
                "name": "Role",
                "path": "/role",
                "component": "/role/index.vue",
                "menuType": "1",
                "icon": "Avatar",
                "sort": 0,
                "meta": {
                    "title": "角色管理",
                    "requiresAuth": null,
                    "roles": [],
                    "breadcrumb": [
                        {}
                    ],
                    "keepAlive": null
                },
                "children": []
            }
        ]
    },
    {
        "id": "3",
        "name": "Log",
        "path": "/log",
        "component": "/log/index.vue",
        "menuType": "1",
        "icon": "Notebook",
        "sort": 0,
        "meta": {
            "title": "日志管理",
            "requiresAuth": null,
            "roles": [],
            "breadcrumb": [
                {}
            ],
            "keepAlive": null
        },
        "children": []
    },
    {
        "id": "4",
        "name": "Study",
        "path": "/study",
        "component": "/study/index.vue",
        "menuType": "0",
        "icon": "Notebook",
        "sort": 0,
        "meta": {
            "title": "学习管理",
            "requiresAuth": null,
            "roles": [],
            "breadcrumb": [
                {}
            ],
            "keepAlive": null
        },
        "children": [
            {
                "id": "441",
                "name": "StudyUser",
                "path": "/studyUser",
                "component": "/study/user/index.vue",
                "menuType": "0",
                "icon": "Notebook",
                "sort": 0,
                "meta": {
                    "title": "用户管理",
                    "requiresAuth": null,
                    "roles": [],
                    "breadcrumb": [
                        {}
                    ],
                    "keepAlive": null
                },
                "children": [
                    {
                        "id": "4441",
                        "name": "Student",
                        "path": "/student",
                        "component": "/study/user/student/index.vue",
                        "menuType": "1",
                        "icon": "Notebook",
                        "sort": 0,
                        "meta": {
                            "title": "学生管理",
                            "requiresAuth": null,
                            "roles": [],
                            "breadcrumb": [
                                {}
                            ],
                            "keepAlive": null
                        },
                        "children": []
                    },
                    {
                        "id": "4442",
                        "name": "Teacher",
                        "path": "/teacher",
                        "component": "/study/user/teacher/index.vue",
                        "menuType": "1",
                        "icon": "Notebook",
                        "sort": 0,
                        "meta": {
                            "title": "教师管理",
                            "requiresAuth": null,
                            "roles": [],
                            "breadcrumb": [
                                {}
                            ],
                            "keepAlive": null
                        },
                        "children": []
                    }
                ]
            },
            {
                "id": "3",
                "name": "Log",
                "path": "/log",
                "component": "/log/index.vue",
                "menuType": "1",
                "icon": "Notebook",
                "sort": 0,
                "meta": {
                    "title": "打卡记录",
                    "requiresAuth": null,
                    "roles": [],
                    "breadcrumb": [
                        {}
                    ],
                    "keepAlive": null
                },
                "children": []
            }
        ]
    }
]
四、router 配置
说明:
- router.addRouter({}) 函数即动态路由,它是临时性的,就是一旦刷新就会清除掉添加的动态路由信息
- 需要重新定位到 localhost:8080 来刷新,重新获取路由信息,方便调试
- 因为是前端静态数据,所以正常,只要连接后端,请求数据后,缓存本地,每次刷新从本地获取即可
- 文章只是完成动态路由的实现,数据的持久性存储,各位根据自己项目自身完善
1、router/index.js
代码如下(示例):
import {
    createRouter,
    createWebHashHistory
} from 'vue-router';
import NotFound from '@/pages/404/404.vue'  // pages 文件下创建404文件,再创建一个404.vue
const routes = [
    { path: "/", component: () => import('@/pages/manage/ManageMain.vue') },  // 登录页
    {
        path: "/manage", name: 'Manage', component: () => import('@/pages/manage/ManageMain.vue'),  // 主页
    },
    { path: '/:pathMatch(.*)*', name: 'NotFound', component: NotFound },
]
const router = createRouter({
    // 4. 内部提供了 history 模式的实现。为了简单起见,我们在这里使用 hash 模式。
    history: createWebHashHistory(),
    routes, // `routes: routes` 的缩写
})
// 导出实例, permission.js 引入
export default router
2、permission.js (与main.js 同级)
说明:
- 注意 NProgress 的引入、配置、使用
- 动态路由的添加(主要是 router.addRoute ,其他的都是根据后端 json 文件的参数来判断,不同的参数配置,不同的判断,这只是我喜欢的参数配置)
- 路径的拼接(component: () => import(/* @vite-ignore */ ./views${item.component}))
- 具体的根据自己的情况配置,打印就知道了,
- 按照我的配置,就不需要改动
代码如下(示例):
// 说明:路由守卫文件
// 引入
import router from "./router";
// 判断用户无token 返回登录页提示有用
import { ElMessage } from 'element-plus';
// 进度条
import NProgress from 'nprogress';
// 简单配置  进度条,可以不配置:在axios中我们不再做配置,以用来区分。
NProgress.inc(0.2)
NProgress.configure({ easing: 'ease', speed: 500, showSpinner: false })
// 一、前置守卫
router.beforeEach((to, from, next) => {
    // 进度条
    NProgress.start();
    // 1、动态路由
    addRoutes();
    // 2、中间处理(token)
    // 3、最后放行
    next();
})
// 动态路由获取:注:之后完善项目直接考虑在登录的时候直接获取
// 直接缓存在 pinia 里
// 这里直接取数据,不请求
import { getTreeMenu } from '@/api/index.js';
import menuData from '@/components/menu2/menuData.json';
function addRoutes() {
    // 1、后端数据
    createRouters(menuData);
    console.log("router/index.js打印router已有的路由信息", router.getRoutes());
}
// 拼接路由
function createRouters(result) {
    result.forEach((item) => {
        // 1、类型为0的菜单,子路由不为空,将子路由添加到manage里
        if (item.menuType === '0' && item.children.length > 0) {
            item.children.forEach((children) => {
                createRouterTemplate('Manage', children);
            })
        }
        // 2、menuType == 1, 子路由为空
        if (item.menuType === '1' && item.children.length === 0) {
            createRouterTemplate('Manage', item);
        }
        // 3、递归层级
        if (item.children.length > 0) {
            createRouters(item.children);
        }
    });
}
// 把router 的动态路由进行封装
function createRouterTemplate(fatherRouter, item) {
    router.addRoute(fatherRouter, {
        path: item.path,
        name: item.name,
        meta: {
            title: item.meta.title, // 面包屑用
            requiresAuth: item.meta.requiresAuth,
            roles: item.meta.roles,
            breadcrumb: item.meta.breadcrumb,
            keepAlive: item.meta.keepAlive
        },
        // /* @vite-ignore */ :处理vite动态导入的警告
        component: () => import(/* @vite-ignore */ `./views${item.component}`)
    })
}
// 二、后置守卫
router.afterEach((to) => {
    // 标签抬头
    document.title = to.meta.title;
    // 进度条
    NProgress.done();
})
// main.js 导入的为这个router
export default router
3、main.js
说明:
- 1.注意 router 的引用文件
- 2.注意 nprogress 的引用
- 3.注意全局定义Element-Plus图标
- 4.注意Vue3动态图标的使用
# Vue3 动态图标的使用
代码如下(示例):
import { createApp } from 'vue'
import './style.css';
import ElementPlus from 'element-plus';
import 'element-plus/dist/index.css';
import App from './App.vue';
// import router from './router';  // 原router
import router from './permission'; // 现router
//Icon全局引入
import * as icons from "@element-plus/icons-vue";
// 进度条
import 'nprogress/nprogress.css';
const app = createApp(App);
// ElementPlus
app.use(ElementPlus);
// Icon全局注册
Object.keys(icons).forEach(key => {
    app.component(key, icons[key])
})
app.use(router);
app.mount('#app')
五、效果
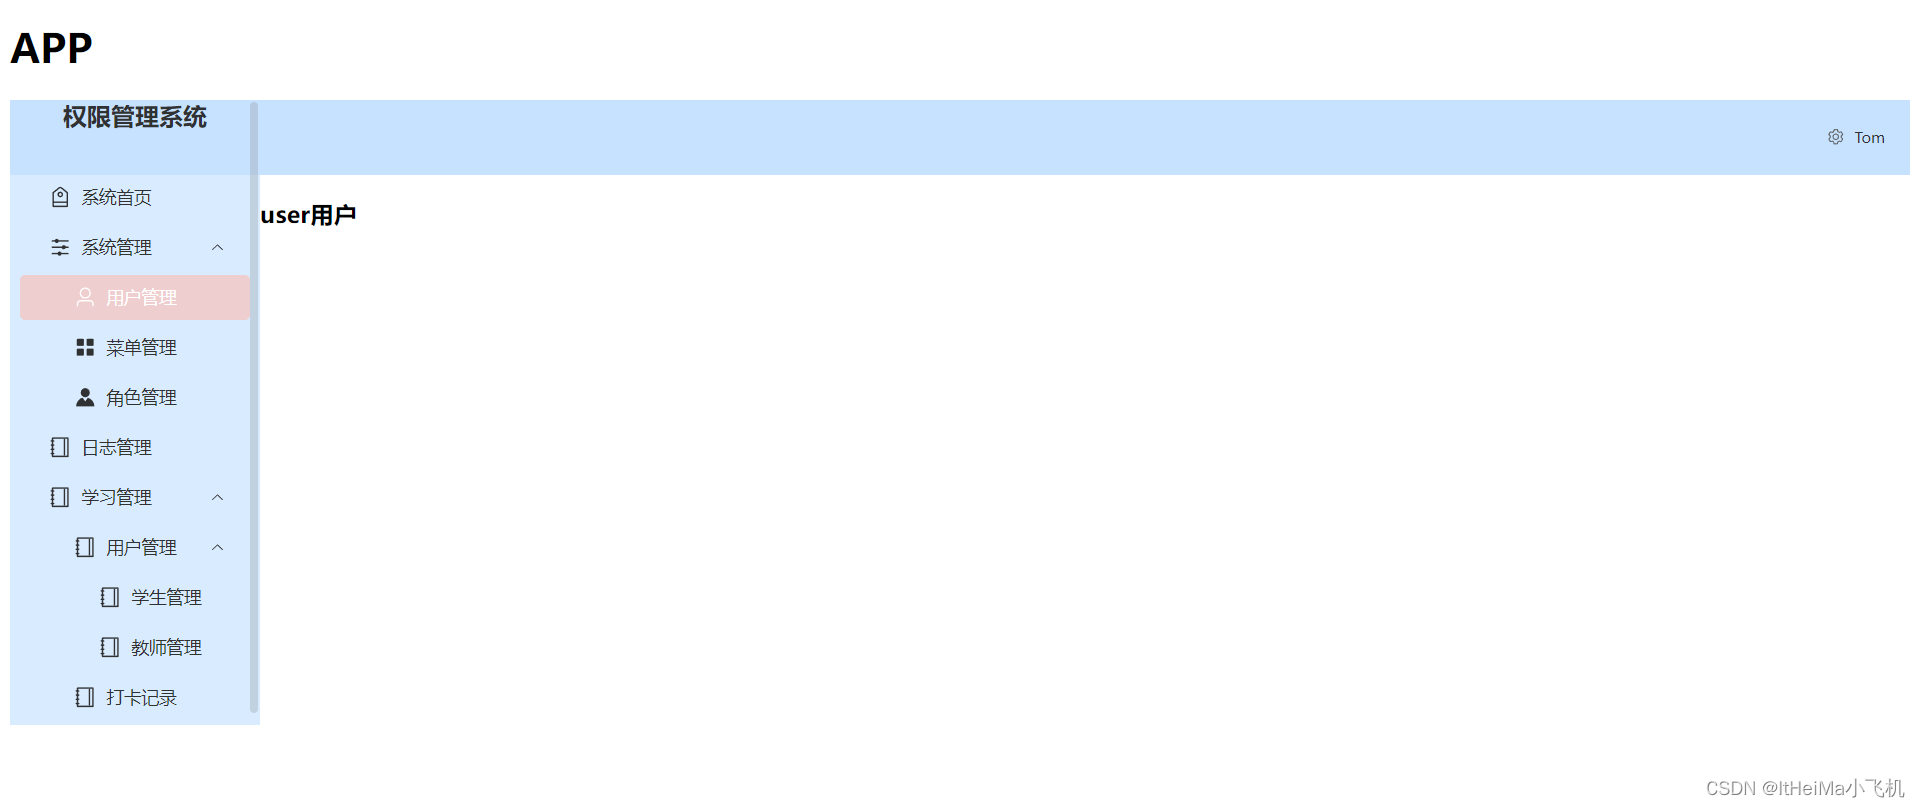
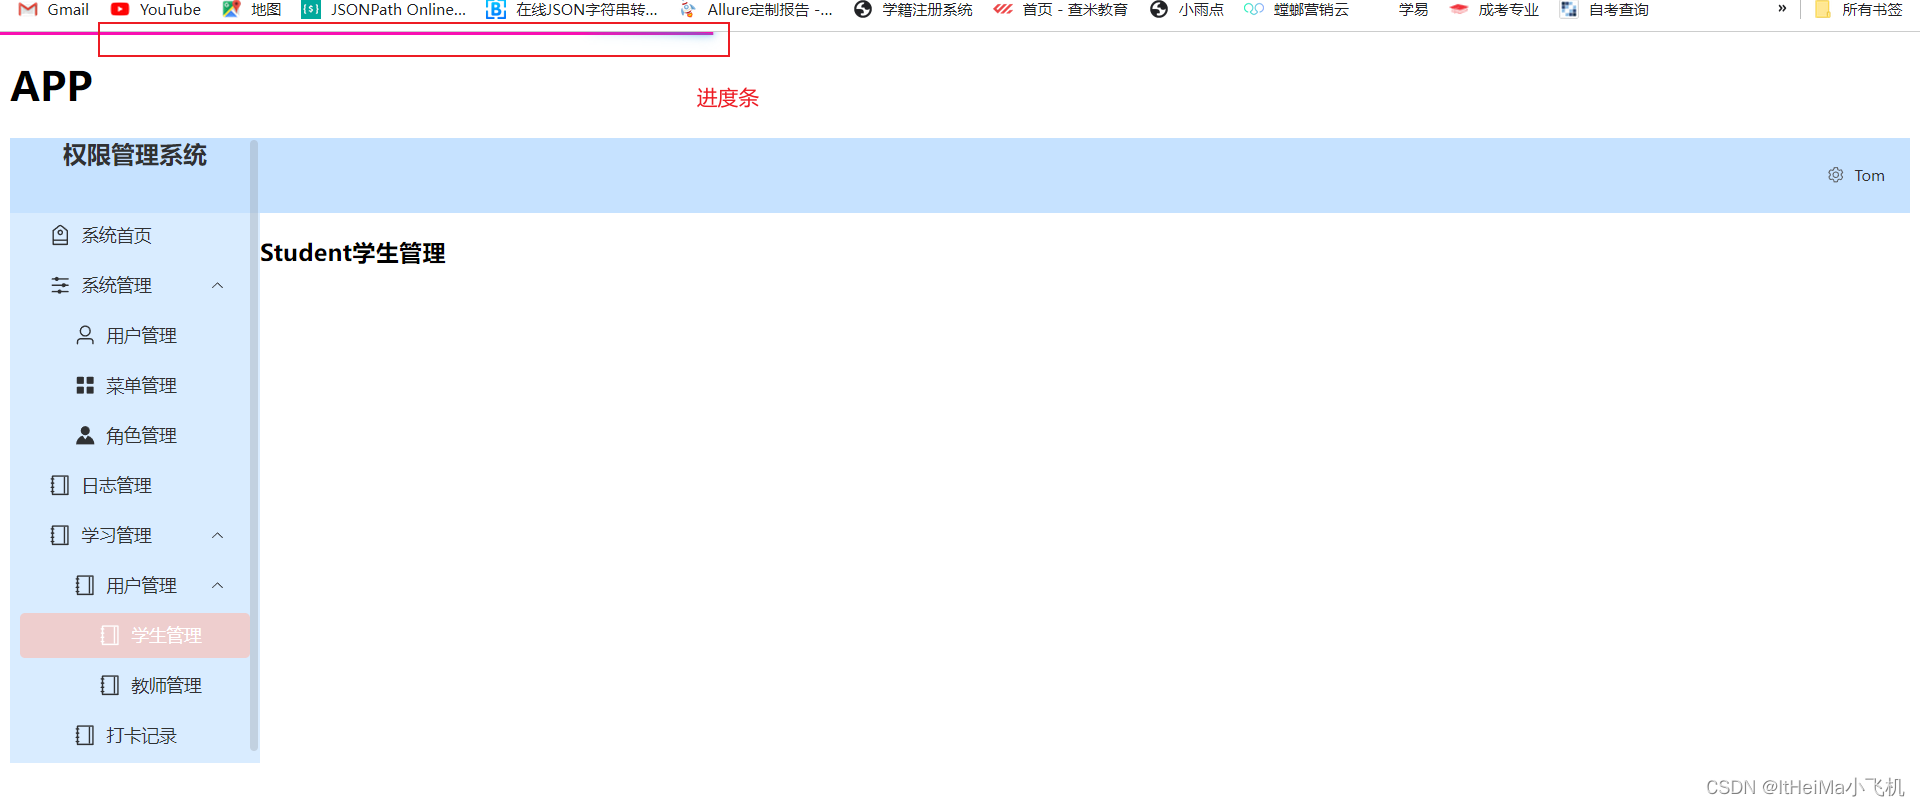
删除menuData.json 文件的某一个路由,界面将不展示!!!
六、给个点赞和收藏
七、参考文献
参考文章 — https://www.cnblogs.com/lpkshuai/p/17346600.html


文章版权声明:除非注明,否则均为主机测评原创文章,转载或复制请以超链接形式并注明出处。
")
")
")
")
还没有评论,来说两句吧...