

鸿蒙开发-web
鸿蒙开发-UI-图形-页面内动画

鸿蒙开发-UI-图形-组件内转场动画
鸿蒙开发-UI-图形-弹簧曲线动画
鸿蒙开发-UI-交互事件-通用事件
鸿蒙开发-UI-交互事件-键鼠事件
鸿蒙开发-UI-交互事件-焦点事件
鸿蒙开发-UI-交互事件-手势事件

文章目录
前言
一、web组件概述
二、web组件加载页面
1.加载网络页面
2.加载本地页面
3.加载html格式文本数据

三、设置基本属性和事件
1. 设置深色模式
1.1 darkMode
1.2 forceDarkAccess
2. 上传文件
3. 在新窗口打开页面
4. 管理位置权限
总结
前言
一、web组件概述
Web组件用于在应用程序中显示Web页面内容,为开发者提供页面加载、页面交互、页面调试等能力

二、web组件加载页面
页面加载若涉及网络资源获取,需要配置ohos.permission.INTERNET网络访问权限
1.加载网络页面
Web组件创建的时候可以指定默认加载的网络页面 。在默认页面加载完成后,可以通过调用loadUrl()接口加载指定网络网页
代码示例
//step1:导入依赖webview
import web_webview from '@ohos.web.webview';
@Entry
@Component
struct WebComponent {
  webviewController: web_webview.WebviewController = new web_webview.WebviewController();
  build() {
    Column() {
      Button('loadUrl')
        .onClick(() => {
          try {
//step3:点击按钮时,通过loadUrl,跳转到指定的网页www.example1.com
            this.webviewController.loadUrl('www.example1.com');
          } catch (error) {
            console.error(`ErrorCode: ${error.code},  Message: ${error.message}`);
          }
        })
//step2:定义Web组件创建时,加载www.example.com
      Web({ src: 'www.example.com', controller: this.webviewController})
    }
  }
}
2.加载本地页面
将本地页面文件放在应用的rawfile目录下,Web组件创建的时候指定默认加载的本地页面 ,并且加载完成后可通过调用loadUrl()接口变更当前Web组件的页面
step1:创建本地html文件local.html
Hello World
step2:将本地文件local.htm放置在应用的resources/rawfile目录下

step3:应用代码
import web_webview from '@ohos.web.webview';
@Entry
@Component
struct WebComponent {
  webviewController: web_webview.WebviewController = new web_webview.WebviewController();
  build() {
    Column() {
      Button('loadUrl')
        .onClick(() => {
          try {
//step2:点击按钮时,通过loadUrl,跳转到本地其他html文件 local1.html
            this.webviewController.loadUrl($rawfile("local1.html"));
          } catch (error) {
            console.error(`ErrorCode: ${error.code},  Message: ${error.message}`);
          }
        })
//step1:组件Web组件,通过$rawfile加载本地文件local.html
      Web({ src: $rawfile("local.html"), controller: this.webviewController })
    }
  }
}
3.加载html格式文本数据
Web组件可以通过loadData接口实现加载HTML格式的文本数据。当开发者不需要加载整个页面,只需要显示一些页面片段时,可通过此功能来快速加载页面
代码示例
import web_webview from '@ohos.web.webview';
@Entry
@Component
struct WebComponent {
controller: web_webview.WebviewController = new web_webview.WebviewController();
build() {
Column() {
Button('loadData')
.onClick(() => {
try {
//step2:点击按钮时,通过loadData,加载HTML格式的文本数据
this.controller.loadData(
"Source:source
",
"text/html",
"UTF-8"
);
} catch (error) {
console.error(`ErrorCode: ${error.code}, Message: ${error.message}`);
}
})
//step1:组件创建时,默认加载www.example.com
Web({ src: 'www.example.com', controller: this.controller })
}
}
}
三、设置基本属性和事件
1. 设置深色模式
1.1 darkMode
darkMode接口可以配置不同的深色模式
代码示例:
import web_webview from '@ohos.web.webview';
@Entry
@Component
struct WebComponent {
  controller: web_webview.WebviewController = new web_webview.WebviewController();
//step1:定义深色模式:WebDarkMode.Off模式表示关闭深色模式;WebDarkMode.On表示开启深色模式,并且深色模式跟随前端页面;WebDarkMode.Auto表示开启深色模式,并且深色模式跟随系统
  @State mode: WebDarkMode = WebDarkMode.Auto;
  build() {
    Column() {
//step2:darkMode接口配置step1定义的深色模式
      Web({ src: 'www.example.com', controller: this.controller })
        .darkMode(this.mode)
    }
  }
}
1.2 forceDarkAccess
forceDarkAccess接口可将前端页面强制配置深色模式,且深色模式不跟随前端页面和系统。配置该模式时候,需要将深色模式配置成WebDarkMode.On。
代码示例:
import web_webview from '@ohos.web.webview';
@Entry
@Component
struct WebComponent {
  controller: web_webview.WebviewController = new web_webview.WebviewController();
//step1:forceDarkAccess要求WebDarkMode必须为on
  @State mode: WebDarkMode = WebDarkMode.On;
  @State access: boolean = true;
  build() {
    Column() {
      Web({ src: 'www.example.com', controller: this.controller })
        .darkMode(this.mode)
//step2:页面强制配置为深色模式
        .forceDarkAccess(this.access)
    }
  }
}
2. 上传文件
Web组件支持前端页面选择文件上传功能,onShowFileSelector()接口处理前端页面文件上传的请求
step1:创建本地html文件 local.html
    Document


// 点击文件上传按钮
step2:本地local.html文件放置到对应目录下
step3:应用侧代码
import web_webview from '@ohos.web.webview';
@Entry
@Component
struct WebComponent {
controller: web_webview.WebviewController = new web_webview.WebviewController()
build() {
Column() {
//step1:加载本地local.html页面
Web({ src: $rawfile('local.html'), controller: this.controller })
//step2:当用户在前端页面点击文件上传按钮,应用侧在onShowFileSelector()接口中收到文件上传请求,在此接口中开发者将上传的本地文件路径设置给前端页面
.onShowFileSelector((event) => {
let fileList: Array = [
'xxx/test.png',
]
if(event){
event.result.handleFileList(fileList)
}
return true;
})
}
}
}
3. 在新窗口打开页面
Web组件提供了在新窗口打开页面的能力,通过multiWindowAccess()接口来设置是否允许网页在新窗口打开。当有新窗口打开时,应用侧会在onWindowNew()接口中收到Web组件新窗口事件,开发者需要在此接口事件中,新建窗口来处理Web组件窗口请求。
4. 管理位置权限
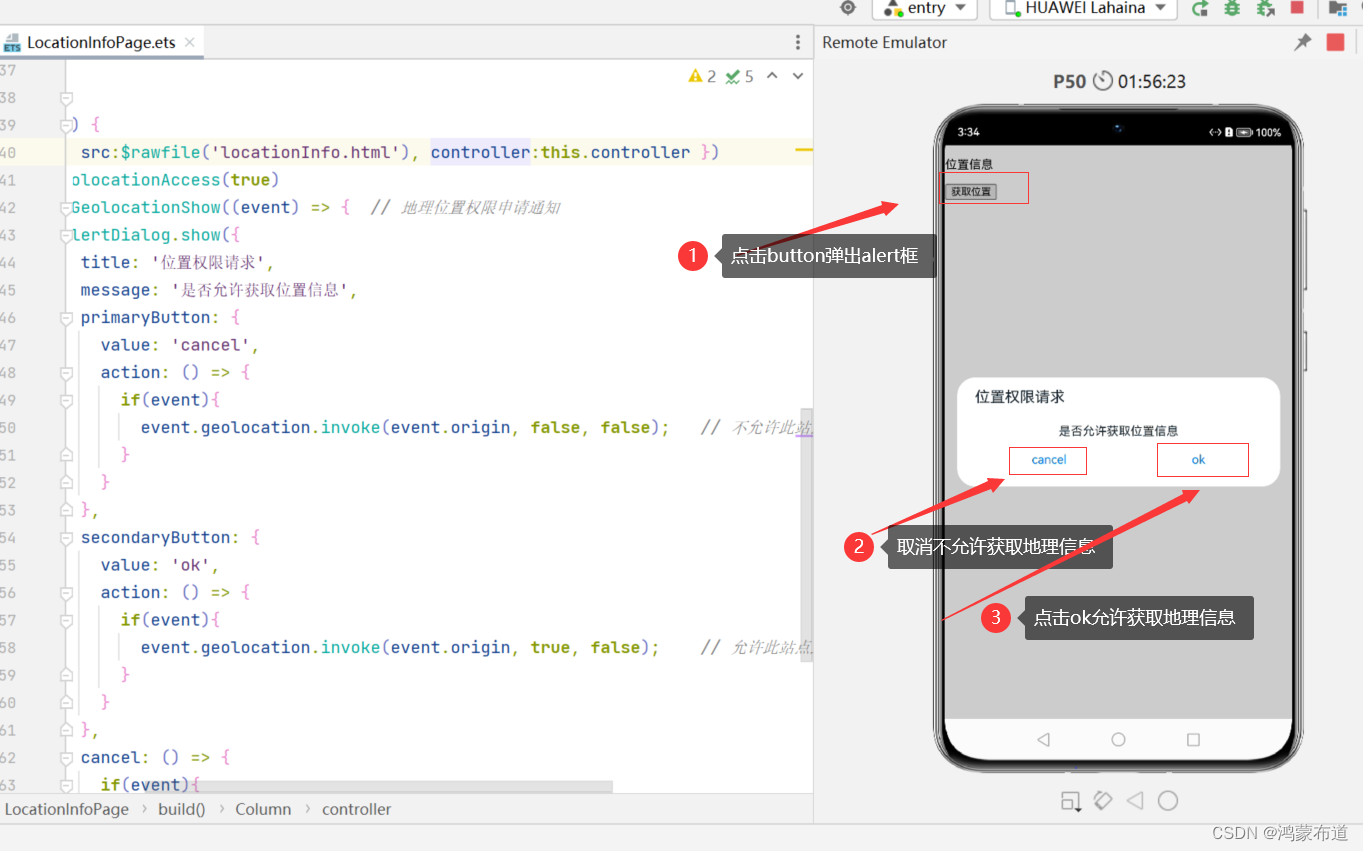
Web组件提供位置权限管理能力,通过onGeolocationShow()接口对某个网站进行位置权限管理。Web组件根据接口响应结果,决定是否赋予前端页面权限。获取设备位置,需要开发者配置ohos.permission.LOCATION权限。
step1:定义本地页面
位置信息
获取位置

var locationInfo=document.getElementById("locationInfo");
function getLocation(){
  if (navigator.geolocation) {

    navigator.geolocation.getCurrentPosition(showPosition);
  }
}
function showPosition(position){
  locationInfo.innerHTML="Latitude: " + position.coords.latitude + "
Longitude: " + position.coords.longitude;
}
step2:应用侧代码
import web_webview from '@ohos.web.webview';
import common from '@ohos.app.ability.common';
import abilityAccessCtrl from '@ohos.abilityAccessCtrl';
import geoLocationManager from '@ohos.geoLocationManager';
let context = getContext(this) as common.UIAbilityContext;
let atManager = abilityAccessCtrl.createAtManager();
try{
  atManager.requestPermissionsFromUser(context, ["ohos.permission.APPROXIMATELY_LOCATION"], (err, data) => {
    let requestInfo: geoLocationManager.LocationRequest = {
      'priority': 0x203,
      'scenario': 0x300,
      'maxAccuracy': 0
    };
    let locationChange = (location: geoLocationManager.Location):void => {
      if(location){
        console.log('locationChanger: location=' + JSON.stringify(location));
      }
    };
    try{
      geoLocationManager.on('locationChange', requestInfo, locationChange);
      geoLocationManager.off('locationChange', locationChange);
    } catch (err) {
      console.error("errCode:" + err.code + ", errMessage:" + err.message);
    }
  })
} catch (err) {
  console.error("err:", err);
}
@Entry
@Component
struct WebComponent {
  controller: web_webview.WebviewController = new web_webview.WebviewController();
  build() {
    Column() {
      Web({ src:$rawfile('getLocation.html'), controller:this.controller })
        .geolocationAccess(true)
        .onGeolocationShow((event) => {  // 地理位置权限申请通知
          AlertDialog.show({
            title: '位置权限请求',
            message: '是否允许获取位置信息',
            primaryButton: {
              value: 'cancel',
              action: () => {
                if(event){
                event.geolocation.invoke(event.origin, false, false);   // 不允许此站点地理位置权限请求
                }
              }
            },
            secondaryButton: {
              value: 'ok',
              action: () => {
                if(event){
                event.geolocation.invoke(event.origin, true, false);    // 允许此站点地理位置权限请求
                }
              }
            },
            cancel: () => {
              if(event){
              event.geolocation.invoke(event.origin, false, false);   // 不允许此站点地理位置权限请求
              }
            }
          })
        })
    }
  }
}
页面渲染,web组件中默认加载locationInfo.html页面
总结
本文学习了鸿蒙开发web相关的知识,了解web组件的基本概念,以及加载页面的三种方式,同时也学习了web组件的的基本属性和事件,下文将学习web的其他知识。
")
")
")
还没有评论,来说两句吧...