

Java微信公众号发送消息-保姆级教程附源码
目录
1. 概念说明:
2. 开发准备:
3. 测试demo(更改配置信息即可使用)
3.1. 服务器配置
3.1.1.配置填写说明
3.1.2.校验服务器有效性:
3.1.3.URL后端接口代码和校验代码(servlet)
3.1.4.配置内网穿透,完成本地调试
3.1.5. 可能存在的问题
3.2 模板消息
3.2.1. 搞定 template_id 即模板消息id:
3.2.2. 搞定 touser 即openid
3.2.3. 从获取openid的请求中我们发现需要access_token:
3.2.4. 发送模板消息的url参数
3.2.5. topcolor
3.2.5. data
3.3. 源码
3.3.1 模板消息DTO
3.3.2. 模板消息内容DTO
3.3.3. access_token缓存类:
3.3.4.http请求工具类:
3.3.5. 最终的Servlet(controller自行转换)(为方便观看所有逻辑都写在这里了,自行优化):
3.4.测试
官方文档:
微信公众平台开发概述 | 微信开放文档
全局返回码文档 :微信开放文档
1. 概念说明:
-
access_token:是公众号的全局唯一接口调用凭据,公众号调用各接口的必要参数(2小时内有效,过期需要重新获取,但1天内获取次数有限,需自行存储)
-
OpenID :为了识别用户每个公众号针对,每个用户会产生一个OpenID(用户id:对用户的操作需要用到)
-
UnionID: 同一开放平台账号下不同公众号或应用下用户的共同id(这里不需要用到)
-
消息会话(这里用到模板消息)
-
公众号是以微信用户的一个联系人形式存在的,消息会话是公众号与用户交互的基础。
-
公众号内主要有这样几类消息服务的类型,分别用于不同的场景:
-
群发消息:订阅号为每天1次,服务号为每月4次
-
被动回复消息:在用户给公众号发消息后,公众号可以回复一个消息
-
客服消息:用户在公众号内发消息/触发特定行为后,公众号可以给用户发消息
-
模板消息:在需要对用户发送服务通知(如刷卡提醒、服务预约成功通知等)时,公众号可以用特定内容模板,主动向用户发送消息。
-
2. 开发准备:
- 开发者在公众平台网站中创建服务号、获取接口权限后方可开始
https://kf.qq.com/faq/120911VrYVrA150918fMZ77R.html?scene_id=kf3386
-
个人研究测试:通过手机微信扫描二维码获得测试号
https://mp.weixin.qq.com/debug/cgi-bin/sandbox?t=sandbox/login
3. 测试demo(更改配置信息即可使用)
3.1. 服务器配置
这里坑比较多,服务器配置不是随便填一个url就完事了,需要后端接口配合校验。
界面:
测试号界面:
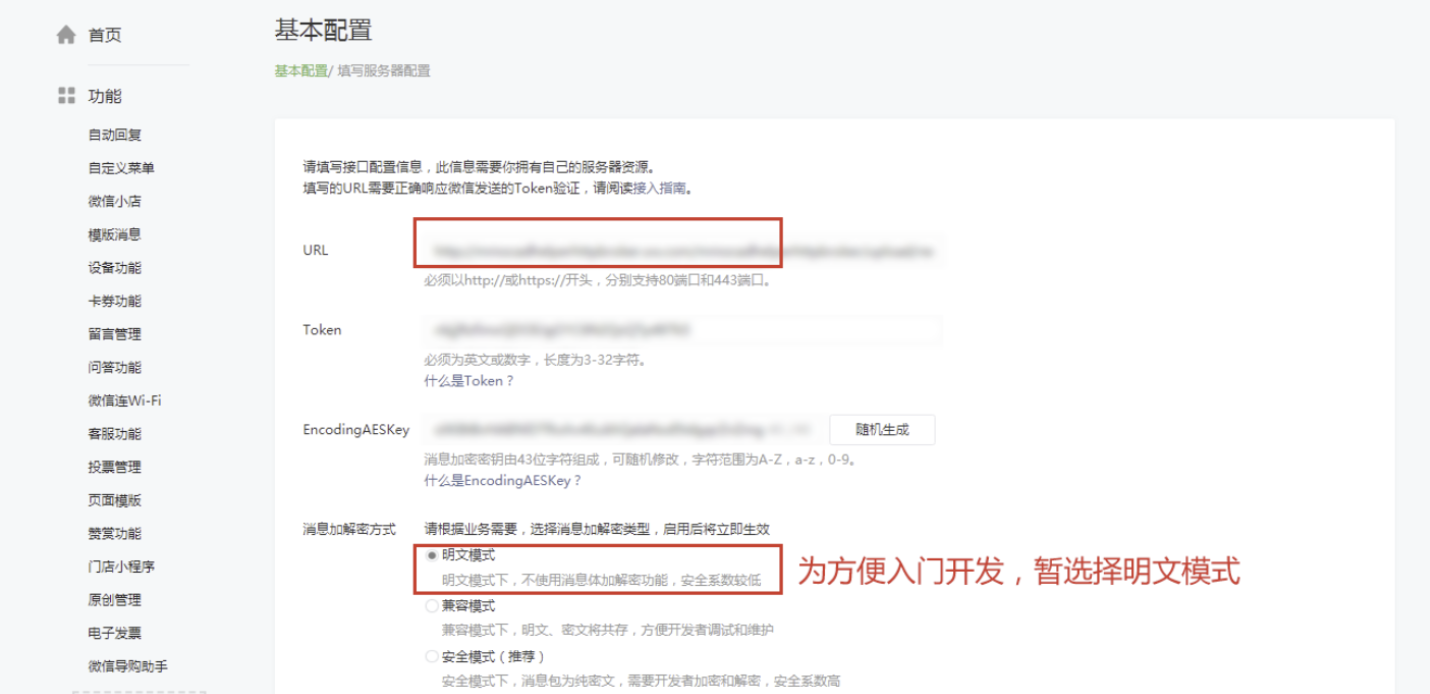
3.1.1.配置填写说明
-
URL:服务器地址--是开发者用来接收微信消息和事件的接口URL (在提交配置修改时微信会向该URL接口发送请求验证服务器地址的有效性)
-
Token:任意填写,用作生成签名(微信向上述URL接口发送的请求是携带token的,需要在接口中校验token一致以确保安全性)这个token与上述的access_token不是一回事。这个token只用于验证开发者服务器。
-
EncodingAESKey: 由开发者手动填写或随机生成,将用作消息体加解密密钥
-
消息加解密方式 :明文模式、兼容模式和安全模式
3.1.2.校验服务器有效性:
这是重点:点击完提交修改后,微信会向url发起一个请求并将token携带过去,这个请求要能正确被你的后端服务器所响应并返回正确的结果,服务器配置才算修改成功
校验请求说明:
- 开发者提交信息后,微信服务器将发送GET请求到填写的服务器地址URL上,GET请求携带参数如下表所示:
-
signature:微信加密签名,signature结合了开发者填写的token参数和请求中的timestamp参数、nonce参数。
-
timestamp:时间戳
-
nonce :随机数
-
echostr:随机字符串
-
-
开发者通过检验signature对请求进行校验(下面有校验方式)。若确认此次GET请求来自微信服务器,请原样返回echostr参数内容,则接入生效,成为开发者成功,否则接入失败。
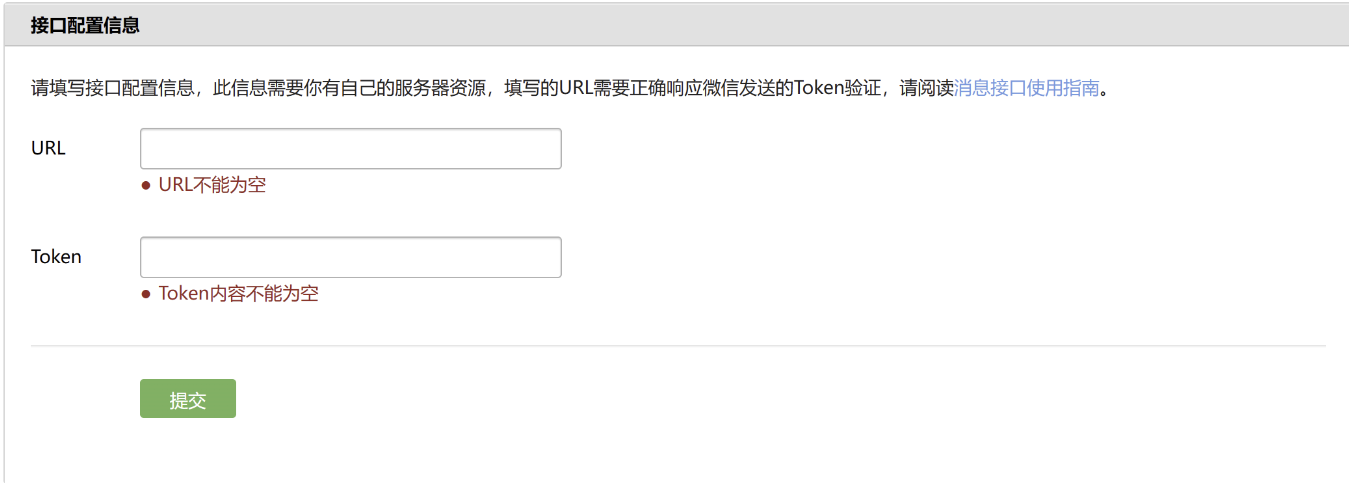
3.1.3.URL后端接口代码和校验代码(servlet)
@WebServlet(urlPatterns = { "/wx"}) public class WxServlet extends HttpServlet { // 服务器配置填写的token private static final String wxToken = "888888"; @Override protected void doGET(HttpServletRequest request, HttpServletResponse response) throws ServletException, IOException { doGetWx(request, response); } /** * @Description 校验配置URL服务器的合法性 * @date 2023年5月29日下午4:17:40 * @param request * @param response * @throws ServletException * @throws IOException */ public void doGetWx(HttpServletRequest request, HttpServletResponse response) throws ServletException, IOException { String signature = request.getParameter("signature"); String timestamp = request.getParameter("timestamp"); String nonce = request.getParameter("nonce"); String echostr = request.getParameter("echostr"); // 将微信echostr返回给微信服务器 try (OutputStream os = response.getOutputStream()) { String sha1 = getSHA1(wxToken, timestamp, nonce, ""); // 和signature进行对比 if (sha1.equals(signature)) { // 返回echostr给微信 os.write(URLEncoder.encode(echostr, "UTF-8").getBytes()); os.flush(); } } catch (Exception e) { e.printStackTrace(); } } /** * 用SHA1算法生成安全签名 * * @param token 票据 * @param timestamp 时间戳 * @param nonce 随机字符串 * @param encrypt 密文 * @return 安全签名 * @throws Exception */ public static String getSHA1(String token, String timestamp, String nonce, String encrypt) throws Exception { try { String[] array = new String[] { token, timestamp, nonce, encrypt }; StringBuffer sb = new StringBuffer(); // 字符串排序 Arrays.sort(array); for (int i = 0; i项目路径是/xjsrm,因此服务器url地址就是:http://localhost:8080/xjsrm/wx
直接将http://localhost:8080/xjsrm/wx地址填到服务配置的url可以吗?答案是不可以!

3.1.4.配置内网穿透,完成本地调试
3.1.4.1. 内网穿透的必要性:
- 微信需要检验服务器有效性,因此这个url必须是公网资源,就是外网能访问的,不支持本地127.0.0.1/localhost ,而且这样调试起来非常的不方便。
- 因此这里使用内网穿透将本地资源映射到公网。(直接部署到服务器上调试的可以跳过)
3.1.4.2. 用到的工具cpolar:
- 也可以使用花生壳、natapp、ngrok等;但不建议使用natapp、ngrok,这两个工具都不能直接访问到服务资源,中间会多一层手动校验(提示用户是否要访问该网站),会造成不必要的麻烦。
3.1.4.3. cpolar配置内网穿透的教程
- 参考大佬的博文 从 2.内网穿透开始看到3.测试公网访问 即可微信公众号本地开发调试 - 无公网IP,内网穿透_微信公众号服务器调试_热爱编程的小K的博客-CSDN博客微信公众号本地开发调试 - 无公网IP,内网穿透
https://blog.csdn.net/qq_72157449/article/details/130237603
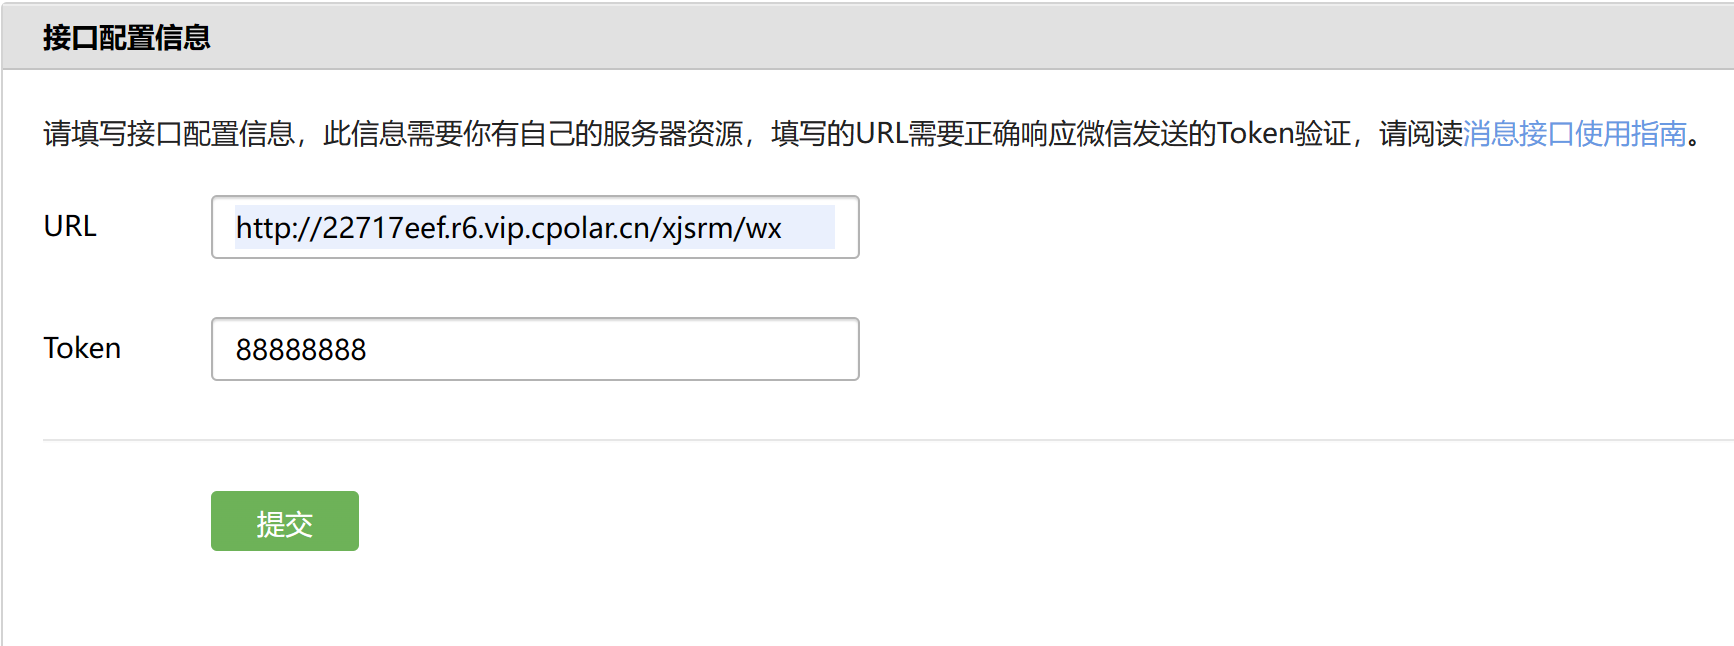
3.1.4.4. 获取本地项目的公网路径
配置完cpolar后在在线隧道列表中找到本地项目的地址,我项目是localhost:8080,因此公网地址对应(最好用https协议)https://22717eef.r6.vip.cpolar.cn 、
因此完整的服务器Url就是: https://22717eef.r6.vip.cpolar.cn/xjsrm/wx
浏览器访问该url,看后端是否接受到了请求,如果接收到说明接口没问题,此时将URL填到对应的配置栏中点击提交即可。
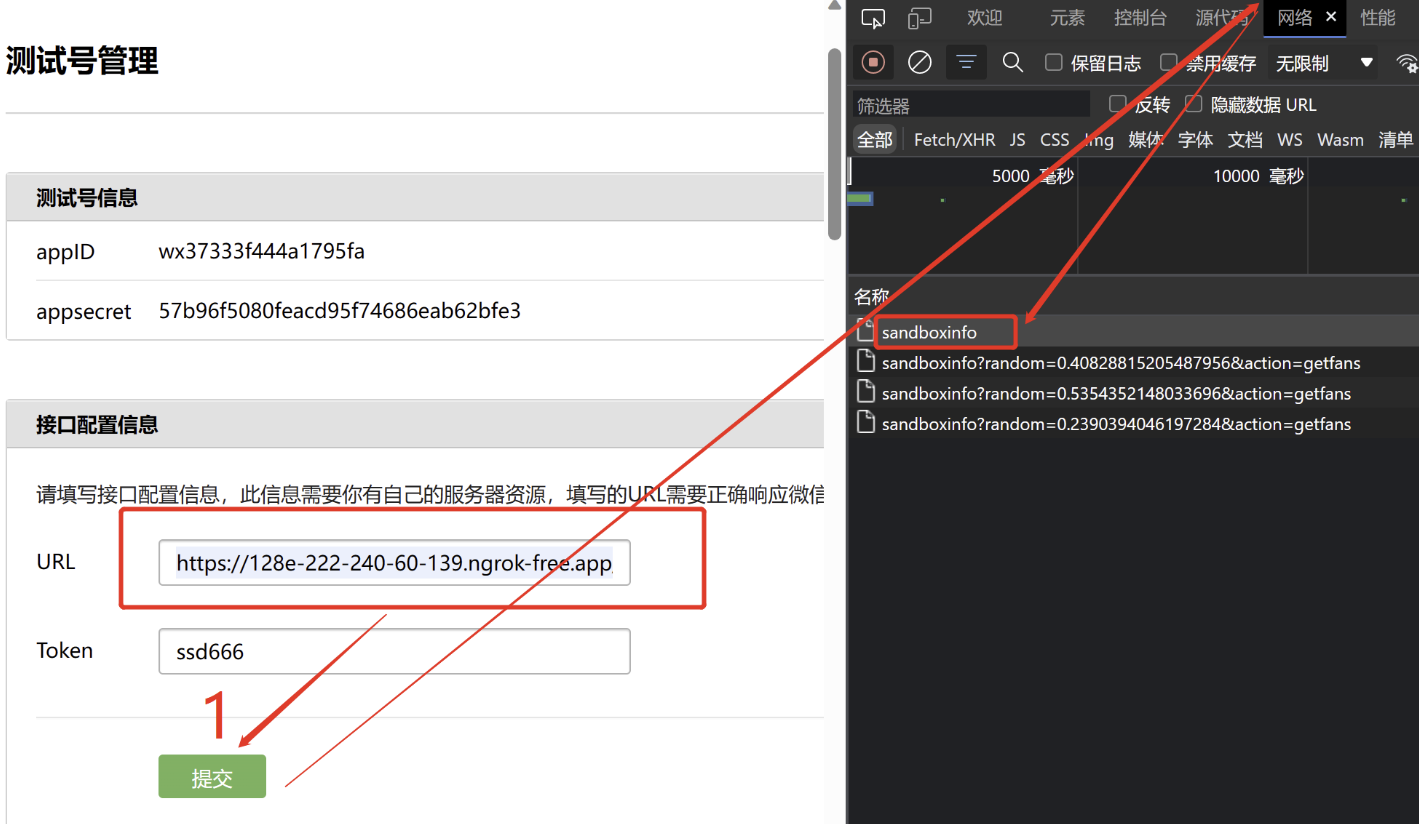
3.1.5. 可能存在的问题
如果你在使用点击修改配置的提交发现微信发送的请求根本就没有进到后端的项目中
此时查看sandboxinfo这个包。如果出现 errorcode=-1多半是内网穿透工具的问题。
出现其他错误代码可以去错误大全中根据信息排查
ngrok错误排查示例:
3.2 模板消息
模板消息的官方文档:微信公众平台 (qq.com)
从官方给出的请求示例入手,看需要准备的接口和数据:
POST请求
https://api.weixin.qq.com/cgi-bin/message/template/send?access_token=ACCESS_TOKEN
请求包为一个json:
{
    "template_id":"ngqIpbwh8bUfcSsECmogfXcV14J0tQlEpBO27izEYtY",
    "touser":"OPENID",
	"url":"http://weixin.qq.com/download",
    "topcolor":"#FF0000",
    "data":{
            "User": {
                "value":"黄先生",
                "color":"#173177"
            },
            "Date":{
                "value":"06月07日 19时24分",
                "color":"#173177"
            },
            "CardNumber": {
                "value":"0426",
                "color":"#173177"
            },
            "Type":{
                "value":"消费",
                "color":"#173177"
            },
            "Money":{
                "value":"人民币260.00元",
                "color":"#173177"
            },
            "DeadTime":{
                "value":"06月07日19时24分",
                "color":"#173177"
            },
            "Left":{
                "value":"6504.09",
                "color":"#173177"
            }
    }
}
3.2.1. 搞定 template_id 即模板消息id:
新增模板消息(以测试号为例)
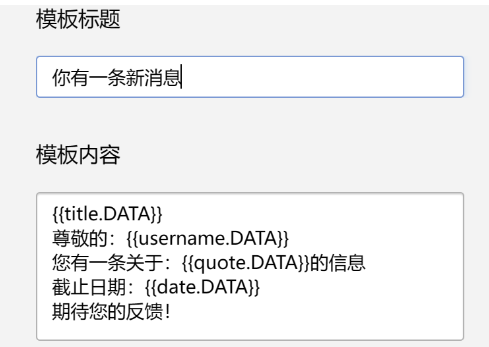
模板内容可设置参数(模板标题不可),供接口调用时使用,参数需以{{开头,以.DATA}}结尾(具体传参看后续代码)
3.2.2. 搞定 touser 即openid
查看用户管理的官方文档;微信开放文档 (qq.com),通过官方接口获取
因为我们是公众号,所以选用获取用户列表的接口:微信开放文档 (qq.com)
http请求方式: GET(请使用https协议)
https://api.weixin.qq.com/cgi-bin/user/get?access_token=ACCESS_TOKEN&next_openid=NEXT_OPENID
参数	是否必须	说明
access_token	是	调用接口凭证
next_openid	是	第一个拉取的OPENID,不填默认从头开始拉取
返回说明
正确时返回JSON数据包:
{
    "total":2,
    "count":2,
    "data":{
    "openid":["OPENID1","OPENID2"]},
    "next_openid":"NEXT_OPENID"
}
3.2.3. 从获取openid的请求中我们发现需要access_token:
获取access_token官方文档:微信开放文档 (qq.com)
https请求方式: GET https://api.weixin.qq.com/cgi-bin/token?grant_type=client_credential&appid=APPID&secret=APPSECRET
参数说明
参数	是否必须	说明
grant_type	是	获取access_token填写client_credential
appid	是	第三方用户唯一凭证
secret	是	第三方用户唯一凭证密钥,即appsecret
返回说明
正常情况下,微信会返回下述JSON数据包给公众号:
{"access_token":"ACCESS_TOKEN","expires_in":7200}
3.2.4. 发送模板消息的url参数
这个是发送消息后用户点击卡片跳转的地址(自定义)可以不填
3.2.5. topcolor
消息卡片的顶部颜色(自定义)
3.2.5. data
消息的内容(了解结构即可,后续代码中会体现)
3.3. 源码
拷贝完再理解
3.3.1 模板消息DTO
import java.util.Map;
/**
* @Description 微信公众号模板消息请求对象
* @author isymi
* @version
* @date 2023年5月29日下午4:28:09
*
 */
public class TemplateMessage {

		/**
		 * 发送消息用户的openid
		 */
	  	private String touser;
	  	/*
	  	 * 模板消息id
	  	 */
	    private String template_id;
	    /**
	     * 点击模板信息跳转地址;置空:则在发送后,点击模板消息会进入一个空白页面(ios),或无法点击(android)
	     */
	    private String url;
	    /**
	     * 卡片顶部颜色
	     */
	    private String topcolor;

	    /**
	     * key为模板中参数内容"xx.DATA"的xx,value为参数对应具体的值和颜色
	     */
	    private Map data;
	   // private String data;
		public TemplateMessage() {
		}
	    public TemplateMessage(String touser, String template_id, String url, String topcolor, Map data) {
	        this.touser = touser;
	        this.template_id = template_id;
	        this.url = url;
	        this.topcolor = topcolor;
	        this.data = data;
	    }
		public String getTouser() {
			return touser;
		}
		public void setTouser(String touser) {
			this.touser = touser;
		}
		public String gettemplate_id() {
			return template_id;
		}
		public void settemplate_id(String template_id) {
			this.template_id = template_id;
		}
		public String getUrl() {
			return url;
		}
		public void setUrl(String url) {
			this.url = url;
		}
		public String getTopcolor() {
			return topcolor;
		}
		public void setTopcolor(String topcolor) {
			this.topcolor = topcolor;
		}
		public Map getData() {
			return data;
		}
		public void setData(Map data) {
			this.data = data;
		}
		@Override
		public String toString() {
			return "TemplateMessage [touser=" + touser + ", template_id=" + template_id + ", url=" + url + ", topcolor="
					+ topcolor + ", data=" + data + "]";
		}
}
3.3.2. 模板消息内容DTO
import java.io.Serializable;
/**
* @Description 模板消息内容类
* @author isymi
* @version
* @date 2023年5月29日下午4:33:27
*
 */
public class WeChatTemplateMsg implements Serializable{
	/**
     * 消息实参
     */
    private String value;
    /**
     * 消息颜色
     */
    private String color;


    public WeChatTemplateMsg(String value) {
        this.value = value;
        this.color = "#173177";
    }

    public WeChatTemplateMsg(String value, String color) {
        this.value = value;
        this.color = color;
    }
	@Override
	public String toString() {
		return "WeChatTemplateMsg [value=" + value + ", color=" + color + "]";
	}
	public String getValue() {
		return value;
	}
	public void setValue(String value) {
		this.value = value;
	}
	public String getColor() {
		return color;
	}
	public void setColor(String color) {
		this.color = color;
	}
}
3.3.3. access_token缓存类:
/**
* @Description access_token缓存类
* @author
* @version
* @date 2023年5月30日上午10:40:08
*
 */
public class AccessToken {

	private String accessToken;
    //过期时间 当前系统时间+微信传来的过期时间
    private Long expiresTime;
    public AccessToken(String accessToken, String expiresIn) {
        this.accessToken = accessToken;
        this.expiresTime = System.currentTimeMillis()+Integer.parseInt(expiresIn)*1000;
    }
    /**
     * 判断token是否过期
     * @return
     */
    public boolean isExpired(){
        return System.currentTimeMillis()>expiresTime;
    }
	public String getAccessToken() {
		return accessToken;
	}
	public void setAccessToken(String accessToken) {
		this.accessToken = accessToken;
	}
	public Long getExpiresTime() {
		return expiresTime;
	}
	public void setExpiresTime(Long expiresTime) {
		this.expiresTime = expiresTime;
	}
	public AccessToken(String accessToken, Long expiresTime) {
		this.accessToken = accessToken;
		this.expiresTime = expiresTime;
	}
	public AccessToken() {
	}
}
3.3.4.http请求工具类:
import java.io.BufferedReader;
import java.net.*;
import java.nio.charset.StandardCharsets;
import java.io.IOException;
import java.io.InputStreamReader;
import java.io.OutputStream;
import java.net.HttpURLConnection;
import java.net.URL;
import java.util.ArrayList;
import java.util.List;
import com.alibaba.fastjson.JSON;
import com.alibaba.fastjson.JSONArray;
import com.alibaba.fastjson.JSONObject;
import com.xx.xx.pojo.TemplateMessage;
/**
* @Description 微信公众号http请求工具类
* @author isymi
* @version
* @date 2023年5月29日下午4:07:39
*
 */
public class WXPublicAccountHttpUtil {


	/**
	* @Description 根据请求获取返回结果字符串(根据请求获取accessToken)
	* @date 2023年5月29日下午4:04:21
	* @param url
	* @return
	* @throws IOException
	 */
	public static String get(String url) throws IOException {
        HttpURLConnection connection = null;
        BufferedReader reader = null;
        try {
            URL requestUrl = new URL(url);
            connection = (HttpURLConnection) requestUrl.openConnection();
            connection.setRequestMethod("GET");
            int responseCode = connection.getResponseCode();
            if (responseCode == HttpURLConnection.HTTP_OK) {
                reader = new BufferedReader(new InputStreamReader(connection.getInputStream()));
                StringBuilder response = new StringBuilder();
                String line;
                while ((line = reader.readLine()) != null) {
                    response.append(line);
                }
                return response.toString();
            } else {
                // Handle error response
                System.out.println("HTTP GET request failed with response code: " + responseCode);
                return null;
            }
        } finally {
            if (reader != null) {
                reader.close();
            }
            if (connection != null) {
                connection.disconnect();
            }
        }
    }

	/**
	* @Description 根据URl获取JSONObject:根据请求获取关注用户列表数据
	* @date 2023年5月29日下午4:02:16
	* @param url
	* @return
	* @throws IOException
	 */
	public static JSONObject getJsonObject(String url) throws IOException {
        HttpURLConnection connection = null;
        BufferedReader reader = null;
        try {
            URL urlObj = new URL(url);
            connection = (HttpURLConnection) urlObj.openConnection();
            connection.setRequestMethod("GET");
            StringBuilder response = new StringBuilder();
            reader = new BufferedReader(new InputStreamReader(connection.getInputStream(), "UTF-8"));
            String line;
            while ((line = reader.readLine()) != null) {
                response.append(line);
            }

            /*
             * 	正确返回的格式
             *      {
    					"total":2,
    					"count":2,
    					"data":{
    						"openid":["OPENID1","OPENID2"]},
    					"next_openid":"NEXT_OPENID"
					}
             */
            return JSON.parseObject(response.toString());
        } finally {
            if (reader != null) {
                reader.close();
            }
            if (connection != null) {
                connection.disconnect();
            }
        }
    }
	/**
	* @Description 获取关注用户的 openid 集合
	* @date 2023年5月29日下午4:04:02
	* @param url
	* @return
	* @throws IOException
	 */
    public static  List getOpenidList(String url) throws IOException {
    	// 获取关注用户列表数据
        JSONObject jsonObject = getJsonObject(url);
        System.out.println(jsonObject);

        // 错误情况
        if (jsonObject.containsKey("errcode")) {
            int errcode = jsonObject.getIntValue("errcode");
            String errmsg = jsonObject.getString("errmsg");
            throw new RuntimeException("Failed to get openid list. errcode: " + errcode + ", errmsg: " + errmsg);
        }

        int total = jsonObject.getIntValue("total");
       // 无用户关注 {"total":0,"count":0,"next_openid":""}
        if (total == 0) {
            throw new RuntimeException("No openid found. Total is 0.");
        }
        // 有用户关注:
        /**
         * {"total":1,
         * 	"data":{
         * 		"openid":["o-tgG5-VaQfsgdjerHA-z2PeZFls"]},
         * 		"count":1,
         * 		"next_openid":"o-tgG5-VaQfsgdjerHA-z2PeZFls"}
         */
        JSONObject dataObject = jsonObject.getJSONObject("data");

        int count = dataObject.getIntValue("count");
        System.out.println("关注总人数:"+count);
        JSONArray openidArray = dataObject.getJSONArray("openid");

        // 将 openid 数组封装为 List 集合
        List openidList = new ArrayList();
        for (int i = 0; i = 200 && responseCode {title.DATA}} {{username.DATA}} {{quote.DATA}} {{date.DATA}}
			// WeChatTemplateMsg对应实参和字体颜色
			Map
- 参考大佬的博文 从 2.内网穿透开始看到3.测试公网访问 即可微信公众号本地开发调试 - 无公网IP,内网穿透_微信公众号服务器调试_热爱编程的小K的博客-CSDN博客微信公众号本地开发调试 - 无公网IP,内网穿透
- 也可以使用花生壳、natapp、ngrok等;但不建议使用natapp、ngrok,这两个工具都不能直接访问到服务资源,中间会多一层手动校验(提示用户是否要访问该网站),会造成不必要的麻烦。
- 开发者提交信息后,微信服务器将发送GET请求到填写的服务器地址URL上,GET请求携带参数如下表所示:
-
")
")
")

还没有评论,来说两句吧...