

手把手教你搭建MongoDB分片式部署集群+实战
一、部署方式对比
MongoDB 有三种集群部署模式,分别为主从复制(Master-Slaver)、副本集(Replica Set)和分片(Sharding)模式。
- Master-Slaver 是一种主从副本的模式,目前已经不推荐使用。
- Replica Set 模式取代了 Master-Slaver 模式,是一种互为主从的关系。Replica Set 将数据复制多份保存,不同服务器保存同一份数据,在出现故障时自动切换,实现故障转移,在实际生产中非常实用。
- Sharding 模式适合处理大量数据,它将数据分开存储,不同服务器保存不同的数据,所有服务器数据的总和即为整个数据集。
Sharding 模式追求的是高性能,而且是三种集群中最复杂的。在实际生产环境中,通常将 Replica Set 和 Sharding 两种技术结合使用。
二、分片式部署简介
分片是指将数据拆分并分散存放在不同机器上的过程,有时也用分区来表示这个概念。将数据分散到不同的机器上,不需要功能强大的计算机就可以存储更多的数据,处理更大的负载。MongoDB支持自动分片,可以使数据库架构对应用程序不可见,简化系统管理。对应用程序而言,就如同始终在使用一个单机的MongoDB服务器一样。
MongoDB的分片机制允许创建一个包含许多台机器的集群,将数据子集分散到集群中。每个分片维护着一个数据集合的子集。与副本集相比,使用集群架构可以使应用程序具有更强大的数据处理能力。
MongoDB分片的集群模式如下图所示:

三、分片集群组件介绍
构建一个MongoDB的分片集群,需要三个重要组件,分别是分片服务器(Shard Server)、配置服务器(Config Server)、路由服务器(Router Server)。
1、Shard Server
每个分片服务器都是一个mongod数据库实例,用于存储实际的数据块,整个数据库集合分成多个存储在不同的分片服务器中。在实际生产中,一个Shard Server可以由多台机器组成一个副本集来承担,防止因主节点单点故障导致整个系统崩溃。
2、Config Server
这是独立的一个mongod进程,存储所有数据库元信息(路由、分片)的配置。mongos本身没有物理存储分片服务器和数据路由信息,只是缓存在内存里,配置服务器则实际存储这些数据。
mongos第一次启动或者关掉重启就会从config server加载配置信息,以后如果配置服务器信息变化会通知到所有的mongos更新自己的状态,这样mongos就能继续准确路由。在生产环境通常设置多个config server,因为它存储了分片路由的元数据,防止单点数据丢失!
3、Router Server
这是独立的一个mongod进程,Router Server在集群中可作为路由使用,客户端由此
接入,让整个集群看起来像是一个单一的数据库,提供客户端应用程序和分片集群之间的接口。
Router Server本身不保存数据,启动时从Config Server加载集群信息到缓存中,并将客户端的请求路由给每个Shard Server,在各Shard Server返回结果后进行聚合并返回给客户端。
在实际生产环境中,副本集和分片是结合起来使用的,可满足实际应用场景中高可用性和高可扩展性的需求。
四、分片部署实战演练
1、分片集群的搭建说明
使用同一份mongodb二进制文件,即mongod.conf
修改对应的配置就能实现分片集群的搭建
Config Server:使用28017、28018、28019三个端口来搭建
Router Server:使用27017、27018两个端口来搭建
Shard Server: 使用29017、29018、29019、29020、29021、29022六个端口来搭建,三个一组,模拟两个数据的集群,线上生产环境至少需要三个端口
2、Config Server搭建
2.1、配置mongodb.conf
mongodb配置角色的搭建,配置文件路径/usr/local/mongodb/28017/mongodb.conf
文件内容参考如下文件:
# mongod.conf
# for documentation of all options, see:
# http://docs.mongodb.org/manual/reference/configuration-options/
# where to write logging data.
systemLog:
destination: file
logAppend: true
path: /usr/local/mongodb/28017/log/mongod.log
# Where and how to store data.
storage:
dbPath: /usr/local/mongodb/28017/data
journal:
enabled: true
# engine:
# wiredTiger:
# how the process runs
processManagement:
fork: true # fork and run in background
pidFilePath: /usr/local/mongodb/28017/mongod.pid # location of pidfile
timeZoneInfo: /usr/share/zoneinfo
# network interfaces
net:
port: 28017
bindIp: 127.0.0.1 # Enter 0.0.0.0,:: to bind to all IPv4 and IPv6 addresses or, alternatively, use the net.bindIpAll setting.
#security:
#operationProfiling:
#配置副本集名称
replication:
replSetName: crowncadconf
##配置分片角色
sharding:
clusterRole: configsvr
## Enterprise-Only Options
#auditLog:
#snmp:
2.2、启动mongodb configsvr实例
/usr/local/mongodb/bin/mongod -f /usr/local/mongodb/28017/mongodb.conf
/usr/local/mongodb/bin/mongod -f /usr/local/mongodb/28018/mongodb.conf
/usr/local/mongodb/bin/mongod -f /usr/local/mongodb/28019/mongodb.conf
2.3、查询端口监听
netstat -tulnp | grep mongo
2.4、分片集群的配置角色副本集搭建
/usr/local/mongodb/bin/mongo 127.0.0.1:28017
config={_id:"crowncadconf", configsvr: true, members:[{_id:0,host:"127.0.0.1:28017"},{_id:1,host:"127.0.0.1:28018"}]}
rs.initiate(config) #副本集初始化,需要一定的时间
rs.addArb("127.0.0.1:28019") #加入仲裁节点
rs.status() #查看副本集状态
备注:此处的crowncadconf副本集名称要和配置文件中保持一致
3、Router Server搭建
mongodb中的router角色只负责提供一个入口,不存储任何的数据。
3.1、配置mongodb.conf
Router配置文件路径/usr/local/mongodb/27017/mongodb.conf
文件内容参考如下文件:
# mongod.conf
# for documentation of all options, see:
# http://docs.mongodb.org/manual/reference/configuration-options/
# where to write logging data.
systemLog:
destination: file
logAppend: true
path: /mnt/mongodb/27017/log/mongod.log
##不参与数据存储,所以不需要配置存储数据的目录
# how the process runs
processManagement:
fork: true # fork and run in background
pidFilePath: /var/run/mongodb/27017/mongod.pid # location of pidfile
timeZoneInfo: /usr/share/zoneinfo
# network interfaces
net:
port: 27017
bindIp: 127.0.0.1 # Enter 0.0.0.0,:: to bind to all IPv4 and IPv6 addresses or, alternatively, use the net.bindIpAll setting.
#security:
#operationProfiling:
#replication:
#不需要配置副本集名称
#配置configsvr副本集和IP端口
sharding:
configDB: crowncadconf/127.0.0.1:28017,127.0.0.1:28018,127.0.0.1:28019
## Enterprise-Only Options
#auditLog:
#snmp:
Router最重要的配置是:
(1)指定configsvr的地址,使用副本集id+ip端口的方式指定
(2)配置多个Router,任何一个都能正常的获取数据
3.2、启动mongodb Routersvr实例
/usr/local/mongodb/bin/mongos -f /usr/local/mongodb/27017/mongodb.conf
/usr/local/mongodb/bin/mongos -f /usr/local/mongodb/27018/mongodb.conf
3.3、Router验证
需要等到shardsvr搭建完成才能验证
4、Shard Server搭建
数据角色:分片集群的数据角色里存储着真正的数据,所以数据角色一定得使用副本集
此处演练部署两个数据集群,说明如下:
29017、29018、29019一个集群,数据角色crowncaddata1
29020、29021、29022一个集群,数据角色crowncaddata2
备注:线上生产环境一个集群中应至少启用三个mongodb实例
4.1、配置mongodb.conf
shardsvr配置文件路径/usr/local/mongodb/29017/mongodb.conf
文件内容参考如下文件:
分片集群1配置文件:
# mongod.conf
# for documentation of all options, see:
# http://docs.mongodb.org/manual/reference/configuration-options/
# where to write logging data.
systemLog:
destination: file
logAppend: true
path: /mnt/mongodb/29017/log/mongod.log
# Where and how to store data.
storage:
dbPath: /mnt/mongodb/29017/data
journal:
enabled: true
# engine:
# wiredTiger:
# how the process runs
processManagement:
fork: true # fork and run in background
pidFilePath: /var/run/mongodb/29017/mongod.pid # location of pidfile
timeZoneInfo: /usr/share/zoneinfo
# network interfaces
net:
port: 29017
bindIp: 127.0.0.1 # Enter 0.0.0.0,:: to bind to all IPv4 and IPv6 addresses or, alternatively, use the net.bindIpAll setting.
#security:
#operationProfiling:
#配置副本集名称
replication:
replSetName: crowncaddata1
##配置分片角色
sharding:
clusterRole: shardsvr
## Enterprise-Only Options
#auditLog:
#snmp:
分片集群2配置文件:
# mongod.conf
# for documentation of all options, see:
# http://docs.mongodb.org/manual/reference/configuration-options/
# where to write logging data.
systemLog:
destination: file
logAppend: true
path: /mnt/mongodb/29019/log/mongod.log
# Where and how to store data.
storage:
dbPath: /mnt/mongodb/29019/data
journal:
enabled: true
# engine:
# wiredTiger:
# how the process runs
processManagement:
fork: true # fork and run in background
pidFilePath: /var/run/mongodb/29019/mongod.pid # location of pidfile
timeZoneInfo: /usr/share/zoneinfo
# network interfaces
net:
port: 29019
bindIp: 127.0.0.1 # Enter 0.0.0.0,:: to bind to all IPv4 and IPv6 addresses or, alternatively, use the net.bindIpAll setting.
#security:
#operationProfiling:
#配置副本集名称
replication:
replSetName: crowncaddata2
##配置分片角色
sharding:
clusterRole: shardsvr
## Enterprise-Only Options
#auditLog:
#snmp:
4.2、Shard Server启动所有实例
/usr/local/mongodb/bin/mongod -f /usr/local/mongodb/29017/mongodb.conf
/usr/local/mongodb/bin/mongod -f /usr/local/mongodb/29018/mongodb.conf
/usr/local/mongodb/bin/mongod -f /usr/local/mongodb/29019/mongodb.conf
/usr/local/mongodb/bin/mongod -f /usr/local/mongodb/29020/mongodb.conf
/usr/local/mongodb/bin/mongod -f /usr/local/mongodb/29021/mongodb.conf
/usr/local/mongodb/bin/mongod -f /usr/local/mongodb/29022/mongodb.conf
4.3、数据角色的副本集搭建
(1)数据角色crowncaddata1
/usr/local/mongodb/bin/mongo 127.0.0.1:29017
config={_id:"crowncaddata1", members:[{_id:0,host:"127.0.0.1:29017"},{_id:1,host:"127.0.0.1:29018"}]}
rs.initiate(config) #副本集初始化,需要一定的时间
rs.addArb("127.0.0.1:29019")
rs.status() #查看副本集状态
备注:此处的crowncaddata1副本集名称要和配置文件中保持一致
(2)数据角色crowncaddata2
/usr/local/mongodb/bin/mongo 127.0.0.1:29020
config={_id:"crowncaddata2", members:[{_id:0,host:"127.0.0.1:29020"},{_id:1,host:"127.0.0.1:29021"}]}
rs.initiate(config) #副本集初始化,需要一定的时间
rs.addArb("127.0.0.1:29022")
rs.status() #查看副本集状态
备注:此处的crowncaddata2副本集名称要和配置文件中保持一致
5、mongodb分片集群的使用
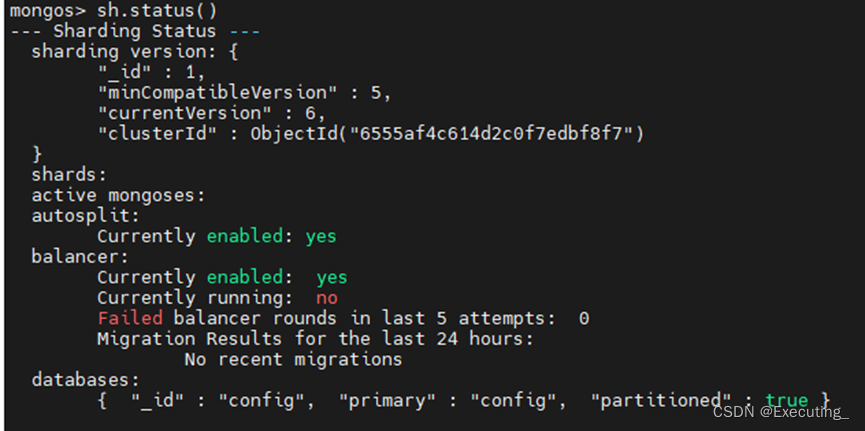
5.1、连接路由服务器
/usr/local/mongodb/bin/mongo 127.0.0.1:27017
sh.status() ##查看分片集群的状态,关注shards和databases分组
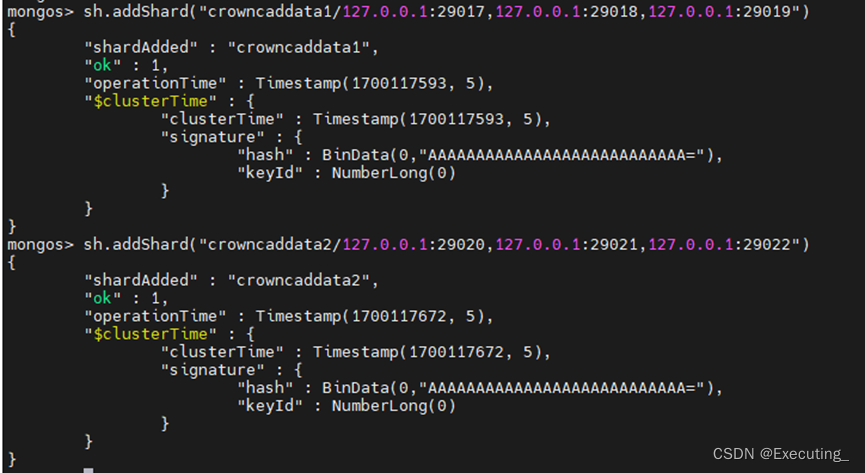
5.2、分片集群添加数据角色,数据角色为副本集的方式
sh.addShard("crowncaddata1/127.0.0.1:29017,127.0.0.1:29018,127.0.0.1:29019")
sh.addShard("crowncaddata2/127.0.0.1:29020,127.0.0.1:29021,127.0.0.1:29022")
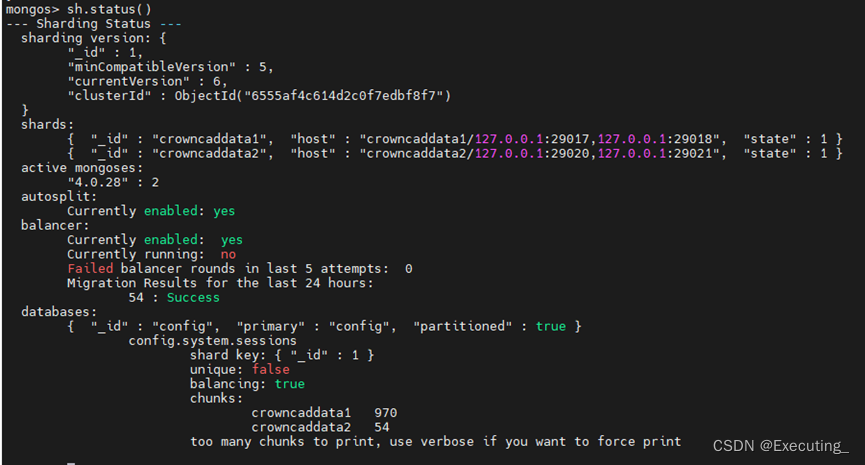
sh.status()
5.3、实际操作演练
默认添加数据是没有使用分片存储的,操作都是在路由服务器中,如:
use crowncad
for (i=1; i
")
")
")

还没有评论,来说两句吧...