

梳理总结SpringBoot+Vue前后端分离的简单实现
var code = “f3df93e6-12d6-46dd-b94c-8d89a3c72b06”
1、简介
想做一个简单的Java前后端分离的项目,不知如何下手,利用闲暇时间将学习的SpringBoot和Vue做一次简单的小整合,从而实现简单的前后端分离,帮助理清前后端思路。
该文档的目的就是为了帮助你理清前后端分离,并将对应的数据进行简单的CRUD,希望对你有所帮助。
2、技术栈
使用的工具:
IntelliJ IDEA 2021.2.1,Maven,Navicat Premium 16,
前端
Vue:3.2.38
axios:1.1.3
ElementUI Plus 2.2.17
后端
SpringBoot 2.7.16
MySQL 8.0.33
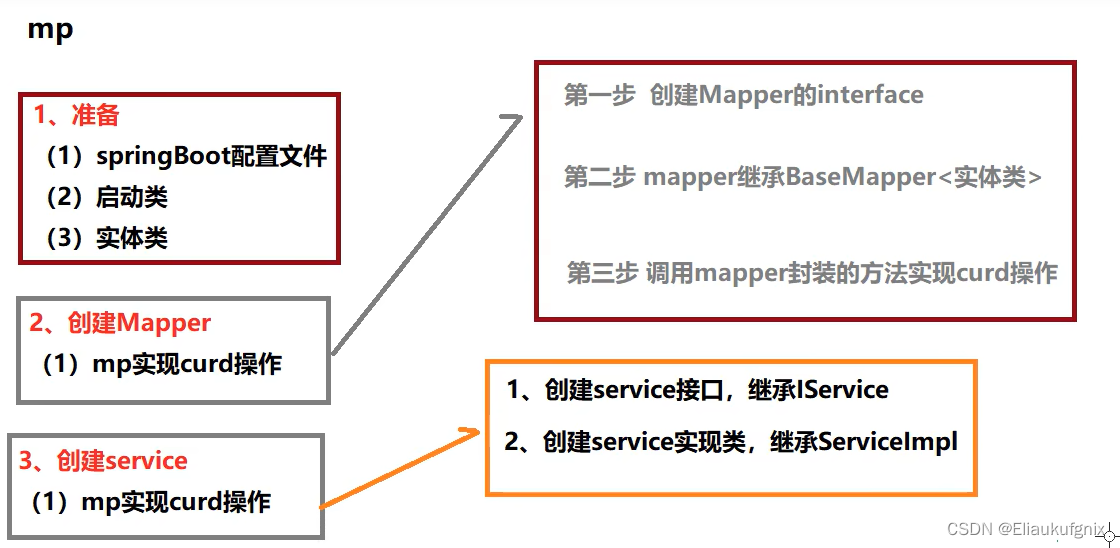
Mybatis Plus
3、常用配置文件
先看项目结构

IDEA创建一个SpringBoot项目,然后修改pom.xml文件添加相关依赖。
3.1、pom.xml文件
    org.springframework.boot
    spring-boot-starter-web


    com.mysql
    mysql-connector-j
    runtime


    com.alibaba
    druid
    1.2.16


    com.baomidou
    mybatis-plus-boot-starter
    3.5.3.1


    org.projectlombok
    lombok
    true


    io.springfox
    springfox-boot-starter
    3.0.0


    org.springframework.boot
    spring-boot-starter-test
    test
3.2、创建数据库和表
推荐一个网站可以快速创建数据库。SQL Father
建表语句
-- 用户表信息
create table if not exists ehelper.userinfo
(
    id          bigint auto_increment comment '主键'
        primary key,
    username    varchar(256)                           not null comment '用户名',
    password    varchar(256)                           not null comment '密码',
    id_card     varchar(256)                           null comment '身份证号',
    real_name   varchar(256)                           not null comment '真实姓名',
    gender      varchar(256)                           not null comment '性别',
    address     varchar(256)                           not null comment '地址',
    phone       varchar(256)                           not null comment '手机号',
    role        varchar(256) default '0'               not null comment '角色',
    age         varchar(256)                           not null comment '年龄',
    user_status varchar(256) default '0'               not null comment '状态',
    update_time datetime     default CURRENT_TIMESTAMP not null on update CURRENT_TIMESTAMP comment '更新时间',
    create_time datetime     default CURRENT_TIMESTAMP not null comment '创建时间',
    is_deleted  tinyint      default 0                 not null comment '是否删除(0-未删, 1-已删)'
)
    comment '用户表信息';
插入数据
insert into ehelper.`userinfo` (`username`, `password`, `real_name`, `gender`, `address`, `phone`, `age`) values ('小花暖', 'password', '叶果', '女', '铜仁市', '17143271301', '99');
insert into ehelper.`userinfo` (`username`, `password`, `real_name`, `gender`, `address`, `phone`, `age`) values ('葵司', 'password', '莫擎宇', '男', '恩施市', '17025595067', '39');
insert into ehelper.`userinfo` (`username`, `password`, `real_name`, `gender`, `address`, `phone`, `age`) values ('三上悠亜', 'password', '王嘉懿', '男', '义乌市', '14774162445', '95');
insert into ehelper.`userinfo` (`username`, `password`, `real_name`, `gender`, `address`, `phone`, `age`) values ('高崎聖子', 'password', '范风华', '女', '汉中市', '17287538963', '73');
insert into ehelper.`userinfo` (`username`, `password`, `real_name`, `gender`, `address`, `phone`, `age`) values ('西田那津', 'password', '戴鹏', '女', '乐山市', '18638853064', '14');
insert into ehelper.`userinfo` (`username`, `password`, `real_name`, `gender`, `address`, `phone`, `age`) values ('篠田優', 'password', '魏嘉熙', '女', '常德市', '17292962094', '46');
insert into ehelper.`userinfo` (`username`, `password`, `real_name`, `gender`, `address`, `phone`, `age`) values ('松本一香', 'password', '龙明哲', '男', '江油市', '17266790854', '50');
insert into ehelper.`userinfo` (`username`, `password`, `real_name`, `gender`, `address`, `phone`, `age`) values ('波多野結衣', 'password', '孟伟宸', '男', '东宁市', '15072855865', '79');
insert into ehelper.`userinfo` (`username`, `password`, `real_name`, `gender`, `address`, `phone`, `age`) values ('櫻空桃', 'password', '黄晓博', '男', '宜都市', '15746429348', '16');
insert into ehelper.`userinfo` (`username`, `password`, `real_name`, `gender`, `address`, `phone`, `age`) values ('小宵虎南', 'password', '彭鸿煊', '男', '瑞金市', '15302919204', '17');
insert into ehelper.`userinfo` (`username`, `password`, `real_name`, `gender`, `address`, `phone`, `age`) values ('高崎聖子', 'password', '吕嘉懿', '女', '宁波市', '17660591291', '90');
insert into ehelper.`userinfo` (`username`, `password`, `real_name`, `gender`, `address`, `phone`, `age`) values ('小野六花', 'password', '卢志强', '女', '来宾市', '15535937195', '87');
insert into ehelper.`userinfo` (`username`, `password`, `real_name`, `gender`, `address`, `phone`, `age`) values ('松本一香', 'password', '周煜祺', '男', '黄冈市', '17810651863', '19');
insert into ehelper.`userinfo` (`username`, `password`, `real_name`, `gender`, `address`, `phone`, `age`) values ('松本一香', 'password', '万锦程', '女', '资阳市', '17703749900', '22');
insert into ehelper.`userinfo` (`username`, `password`, `real_name`, `gender`, `address`, `phone`, `age`) values ('木下日葵', 'password', '秦琪', '女', '聊城市', '15073294885', '23');
insert into ehelper.`userinfo` (`username`, `password`, `real_name`, `gender`, `address`, `phone`, `age`) values ('橋本有菜', 'password', '秦明杰', '女', '百色市', '17532822622', '59');
insert into ehelper.`userinfo` (`username`, `password`, `real_name`, `gender`, `address`, `phone`, `age`) values ('西田那津', 'password', '何鹏飞', '女', '汉中市', '14502218356', '86');
insert into ehelper.`userinfo` (`username`, `password`, `real_name`, `gender`, `address`, `phone`, `age`) values ('神宮寺奈緒', 'password', '范修杰', '男', '滁州市', '15026804786', '34');
insert into ehelper.`userinfo` (`username`, `password`, `real_name`, `gender`, `address`, `phone`, `age`) values ('河北彩花', 'password', '邱鹭洋', '女', '瑞金市', '15378143680', '60');
insert into ehelper.`userinfo` (`username`, `password`, `real_name`, `gender`, `address`, `phone`, `age`) values ('篠田優', 'password', '侯昊强', '女', '漳平市', '17720387499', '35');
修改数据库配置文件application.properties
server.port=8080
spring.datasource.driver-class-name=com.mysql.cj.jdbc.Driver
spring.datasource.url=jdbc:mysql://localhost:3306/store?useSSL=false
spring.datasource.username=root
spring.datasource.password=123456
mybatis-plus.configuration.log-impl=org.apache.ibatis.logging.stdout.StdOutImpl
#单个文件大小,默认1MB
spring.servlet.multipart.max-file-size=10MB
#每次请求文件的大小
spring.servlet.multipart.max-request-size=10MB
#springboot新版本与swagger冲突
spring.mvc.pathmatch.matching-strategy=ant_path_matcher
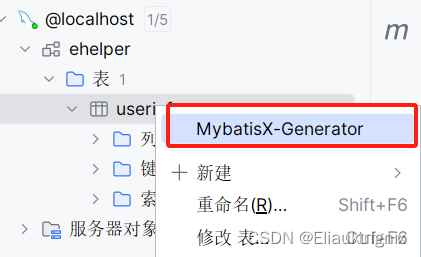
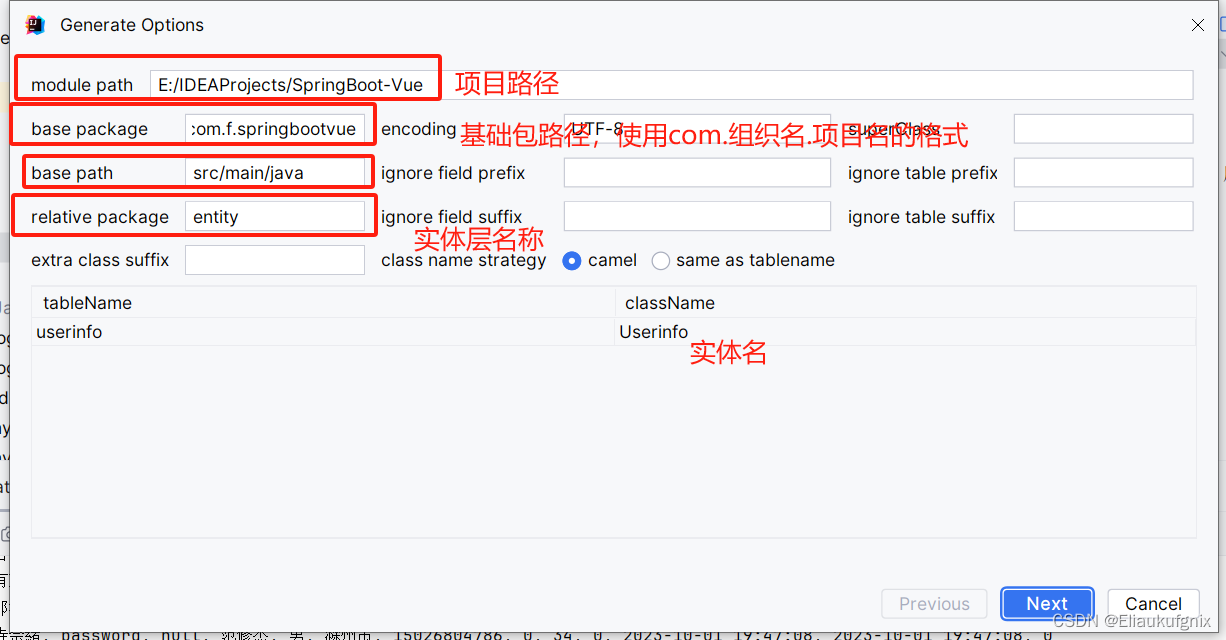
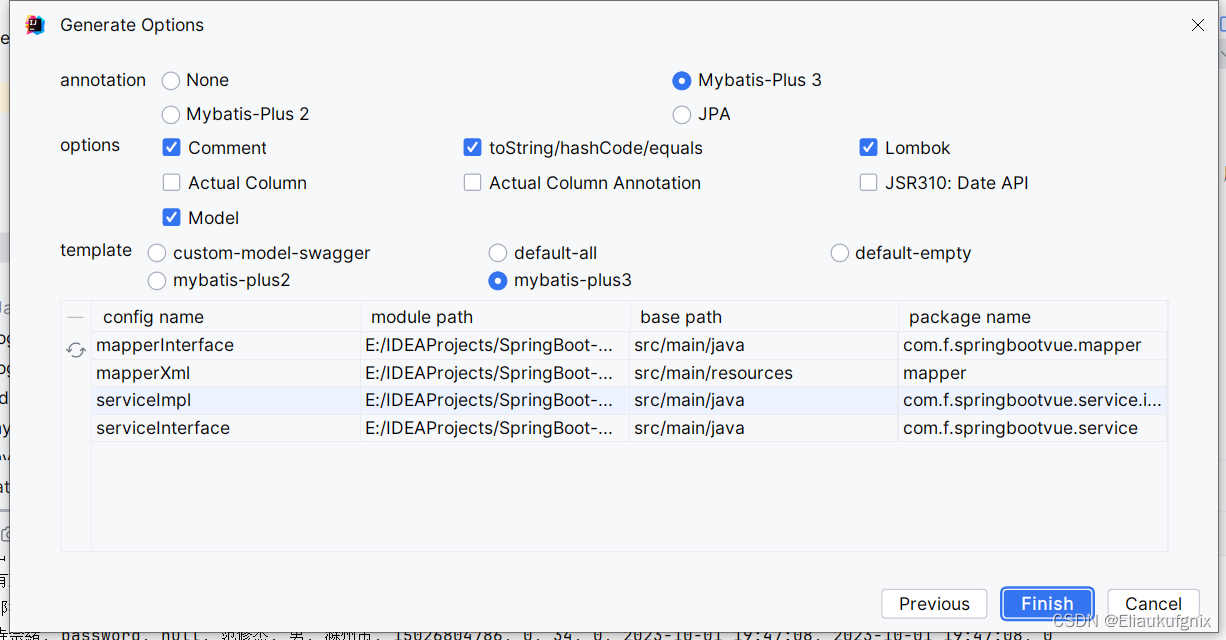
3.3、使用IDEA的插件MybatisX-Generator快速创建相关文件
安装插件MybatisX,连接数据库,右键点击表
3.4、创建controller包
常用注解:
需要使用到的几个注解。简单举例:
@RestController
@RequestMapping(value=“/login”,method = RequestMethod.GET) //该写法等同于GetMapping
@RequestMapping(value=“/login”,method = RequestMethod.POST) //该写法等同于PostMapping
@GetMapping(“/login”)//RESTful风格要求尽量用该注解进行获取资源
@PostMapping(“/login”)//RESTful风格要求尽量用该注解进行新建资源
@PutMapping(“”) //RESTful风格要求尽量用该注解进行更新资源
@DeleteMapping(“”) //RESTful风格要求尽量用该注解进行删除资源
@PathMapping() //RESTful风格要求尽量用该注解进行部分资源更新
@RequestParam 参数传递时,参数名称和方法中的名称不一致时可以使用。被该注解标记的参数必须有值。添加属性required=false可更改不必须有值。
@PathVariable 动态获取一个值。注意:@GetMapping(“/login/{id}”)要加上{}
@RequestBody 接收json类型的注解
@TableLogic 逻辑删除,添加到属性名上。例如:@TableLogic private Integer isDeleted;
Mybatis Plus中的一些注解
@TableId(type = IdType.AUTO) 设置到实体类的主键上,自动填充值。
@TableField(“”) 数据库中的名称和实体类中属性的名称不一致时可以使用。实体类中有数据库中不存在的字段时,可以使用exist=false属性设置为该字段为非数据库字段。
UserInfoController:
@CrossOrigin
@RestController
@@RequestMapping("/userinfo")
public class UserInfoController {
    private final UserinfoService userinfoService;
    @Autowired
    public UserInfoController(UserinfoService userinfoService) {
        this.userinfoService = userinfoService;
    }
    //查询全部
    @GetMapping("/findAll")
    public List findAll(){
        return userinfoService.list();
    }
}
添加@MapperSacn:
启动类中添加@MapperScan(“com.f.springbootvue.mapper”)指向mapper
@MapperScan("com.f.springbootvue.mapper")
SpringBootVueApplication
@SpringBootApplication
@MapperScan("com.f.springbootvue.mapper")
public class SpringBootVueApplication {
    public static void main(String[] args) {
        SpringApplication.run(SpringBootVueApplication.class, args);
    }
}
运行
运行SpringBoot启动类并在浏览器中访问localhost:8080/userinfo/findAll。
3.5、Mybatis Plus分页插件
编写配置类MybatisPlusConfig
@Configuration
@MapperScan("com.f.springbootvue.mapper")
public class MybatisPlusConfig {
    /**
     * 添加分页插件
     */
    @Bean
    public MybatisPlusInterceptor mybatisPlusInterceptor() {
        MybatisPlusInterceptor interceptor = new MybatisPlusInterceptor();
        interceptor.addInnerInterceptor(new PaginationInnerInterceptor(DbType.MYSQL));//如果配置多个插件,切记分页最后添加
        //interceptor.addInnerInterceptor(new PaginationInnerInterceptor()); 如果有多数据源可以不配具体类型 否则都建议配上具体的DbType
        return interceptor;
    }
}
简单使用
//分页查询
@GetMapping("/findByPage")
public IPage findByPage(@RequestParam(defaultValue = "1") Integer pageNum, @RequestParam(defaultValue = "10") Integer pageSize){
    return userinfoService.page(new Page(pageNum, pageSize));
}
3.6、Swagger3的使用
SpringBoot 2.7.12-SNAPSHOT中使用Swagger3
1、pom.xml
    io.springfox
    springfox-boot-starter
    3.0.0
2、SwaggerConfig配置文件类
package com.f.springbootvue.config;
import org.springframework.context.annotation.Bean;
import org.springframework.context.annotation.Configuration;
import springfox.documentation.builders.ApiInfoBuilder;
import springfox.documentation.builders.PathSelectors;
import springfox.documentation.builders.RequestHandlerSelectors;
import springfox.documentation.oas.annotations.EnableOpenApi;
import springfox.documentation.service.ApiInfo;
import springfox.documentation.spi.DocumentationType;
import springfox.documentation.spring.web.plugins.Docket;
@Configuration
@EnableOpenApi
public class SwaggerConfig {
    @Bean
    public Docket createRestApi(){
        return new Docket(DocumentationType.OAS_30)
                .apiInfo(apiInfo())
                .select()
                .apis(RequestHandlerSelectors.basePackage("com.f.springbootvue.controller"))
                .paths(PathSelectors.regex("/.*/error").negate())
                .build();
    }
    private ApiInfo apiInfo(){
        return new ApiInfoBuilder()
                .title("SpringBoot2.7.16中使用Swagger3接口文档")
                .description("一个简单的前后端分离项目的接口文档")
                .version("1.0")
                .build();
    }
}
3、application.properties配置文件中添加
spring.mvc.pathmatch.matching-strategy=ant_path_matcher
server.port=8080
spring.datasource.driver-class-name=com.mysql.cj.jdbc.Driver
spring.datasource.url=jdbc:mysql://localhost:3306/store?useSSL=false
spring.datasource.username=root
spring.datasource.password=123456
mybatis-plus.configuration.log-impl=org.apache.ibatis.logging.stdout.StdOutImpl
#单个文件大小,默认1MB
spring.servlet.multipart.max-file-size=10MB
#每次请求文件的大小
spring.servlet.multipart.max-request-size=10MB
#springboot新版本与swagger冲突
spring.mvc.pathmatch.matching-strategy=ant_path_matcher
4、启动路径
http://localhost:8080/swagger-ui/index.html
5、类上添加一些描述信息
@Api(value = "userinfo",tags = "用户信息接口")
@CrossOrigin
@RestController
@RequestMapping("/userinfo")
public class UserInfoController {
    private final UserinfoService userinfoService;
    @Autowired
    public UserInfoController(UserinfoService userinfoService) {
        this.userinfoService = userinfoService;
    }
    //查询全部
    @ApiOperation(value = "查询全部用户信息")
    @GetMapping("/findAll")
    public List findAll(){
        return userinfoService.list();
    }
    //分页查询
    @ApiOperation(value = "分页查询用户信息")
    @GetMapping("/findByPage")
    public IPage findByPage(@RequestParam(defaultValue = "1") Integer pageNum, @RequestParam(defaultValue = "10") Integer pageSize){
        return userinfoService.page(new Page(pageNum, pageSize));
    }
}
3.7、设置自启动浏览器
RunConfig配置类
@Component
public class RunConfig implements CommandLineRunner {
    private static Logger logger = LoggerFactory.getLogger(RunConfig.class);
    @Value("${spring.web.loginurl}")
    private String loginUrl;
    @Value("${server.port}")
    private String port;
    @Value("${spring.web.address}")
    private String address;
    @Value("${spring.web.googleexcute}")
    private String googleExcutePath;
    @Value("${spring.auto.openurl}")
    private boolean isOpen;
    @Override
    public void run(String... args) throws Exception {
        if(isOpen){
            String cmd = googleExcutePath +" "+ loginUrl+":"+port+address;
            Runtime run = Runtime.getRuntime();
            try{
                run.exec(cmd);
                logger.debug("启动浏览器打开项目成功");
            }catch (Exception e){
                e.printStackTrace();
                logger.error(e.getMessage());
            }
        }
    }
}
配置文件中
#自动打开浏览器:是否打开,想打开下边就写true
spring.auto.openurl=true
spring.web.loginurl=http://localhost
spring.web.address=/swagger-ui/index.html
spring.web.googleexcute=C:\Program Files\Google\Chrome\Application\chrome.exe
4、前端部分
4.1、Vue3
https://cn.vuejs.org/
使用node.js下载Vue3,并创建一个项目。
npm init vue@latest
可供选用的功能
✔ Project name: …
✔ Add TypeScript? … No / Yes
✔ Add JSX Support? … No / Yes
✔ Add Vue Router for Single Page Application development? … No / Yes
✔ Add Pinia for state management? … No / Yes
✔ Add Vitest for Unit testing? … No / Yes
✔ Add Cypress for both Unit and End-to-End testing? … No / Yes
✔ Add ESLint for code quality? … No / Yes
✔ Add Prettier for code formatting? … No / Yes
Scaffolding project in ./...
Done.
4.2、ElementUI Plus
https://element-plus.gitee.io/zh-CN/
使用组件快速开发。
npm install element-plus --save
main.js中添加以下内容
import ElementPlus from 'element-plus'
import 'element-plus/dist/index.css'
app.use(ElementPlus)
4.3、Axios
https://www.axios-http.cn/
第一步:安装
npm install axios
第二步:main.js文件中添加
import axios from 'axios'
第三步:main.js文件中注册
//将axios作为全局的自定义属性,每个组件可以在内部直接访问
app.config.globalProperties.$http=axios
第四步:main.js文件中指定请求头
//配置请求根路径
axios.defaults.baseURL = 'http://localhost:8080';
4.4、跨域
1、@CrossOrigin 在controller包下需要跨域的类添加注解。
2、编写跨域配置文件,允许全部跨域。
5、具体使用
之后可以在前端界面中添加一个ElementUI Plus的表格,启动前端项目和后端项目,使用axios将后端数据加载到前端。
6、前端代码
main.js文件:
import { createApp } from 'vue'
import App from './App.vue'
import router from './router'
import ElementPlus from 'element-plus'
import 'element-plus/dist/index.css'
import './assets/main.css'
import axios from 'axios'
//配置请求根路径
axios.defaults.baseURL = 'http://localhost:8080';
const app = createApp(App)
app.use(ElementPlus)
app.use(router)
//将axios作为全局的自定义属性,每个组件可以在内部直接访问
app.config.globalProperties.$http=axios
app.mount('#app')
前端页面的代码:
这里我是使用的AboutView.vue文件,我将其内容全部重写了。
@media (min-width: 1024px) {
  .about {
    min-height: 100vh;
    display: flex;
    align-items: center;
  }
}


export default{
  created:function(){
    this.$http.get("/user/findAll").then((response)=>{
      this.TableData=response.data
    })
  },
  data() {
    return {
      TableData:[]
    }
  },
}
7、后端代码
MybatisPlusConfig 配置文件:
@Configuration
@MapperScan("com.f.springbootvue.mapper")
public class MybatisPlusConfig {
    /**
     * 添加分页插件
     */
    @Bean
    public MybatisPlusInterceptor mybatisPlusInterceptor() {
        MybatisPlusInterceptor interceptor = new MybatisPlusInterceptor();
        interceptor.addInnerInterceptor(new PaginationInnerInterceptor(DbType.MYSQL));//如果配置多个插件,切记分页最后添加
        //interceptor.addInnerInterceptor(new PaginationInnerInterceptor()); 如果有多数据源可以不配具体类型 否则都建议配上具体的DbType
        return interceptor;
    }
}
SwaggerConfig配置文件:
@Configuration
@EnableOpenApi
public class SwaggerConfig {
    @Bean
    public Docket createRestApi(){
        return new Docket(DocumentationType.OAS_30)
                .apiInfo(apiInfo())
                .select()
                // 读取controller的包名
                .apis(RequestHandlerSelectors.basePackage("com.f.springbootvue.controller"))
                .paths(PathSelectors.any())
                .build();
    }
    private ApiInfo apiInfo(){
        return new ApiInfoBuilder()
                .title("SpringBoot2.7.16中使用Swagger3接口文档")
                .description("一个简单的前后端分离项目的接口文档")
                .version("1.0")
                .build();
    }
}
UserInfoController增删改查
@CrossOrigin
@RestController
@RequestMapping("/userinfo")
public class UserInfoController {
    private final UserinfoService userinfoService;
    @Autowired
    public UserInfoController(UserinfoService userinfoService) {
        this.userinfoService = userinfoService;
    }
    @ApiOperation(value = "查询全部用户信息")
    @GetMapping("/findUserInfoAll")
    public List findUserInfoAll(){
        return userinfoService.list();
    }
    @ApiOperation(value = "查询指定用户信息")
    @GetMapping("/findUserInfoById/{id}")
    public Userinfo findUserInfoById(@PathVariable("id") int id){
        return userinfoService.getById(id);
    }
    @ApiOperation(value = "分页查询用户信息")
    @GetMapping("/findUserInfoByPage")
    public IPage findUserInfoByPage(@RequestParam(defaultValue = "1") Integer pageNum, @RequestParam(defaultValue = "10") Integer pageSize){
        return userinfoService.page(new Page(pageNum, pageSize));
    }
    @ApiOperation(value = "添加用户信息")
    @PostMapping("/addUserInfo")
    public boolean addUserInfo(@RequestBody Userinfo userinfo){
        return userinfoService.save(userinfo);
    }
    @ApiOperation(value = "删除指定用户信息")
    @DeleteMapping("/delUserInfoById//{id}")
    public boolean delUserInfoById(@PathVariable("id") int id){
        return userinfoService.removeById(id);
    }
    @ApiOperation(value = "修改用户信息")
    @PutMapping("/updateUserInfo")
    public boolean updateUserInfo(@RequestBody Userinfo userinfo){
        return userinfoService.updateById(userinfo);
    }
}
Userinfo
package com.f.springbootvue.entity;
import com.baomidou.mybatisplus.annotation.IdType;
import com.baomidou.mybatisplus.annotation.TableField;
import com.baomidou.mybatisplus.annotation.TableId;
import com.baomidou.mybatisplus.annotation.TableName;
import java.io.Serializable;
import java.util.Date;
import lombok.Data;
/**
 * 用户表信息
 * @TableName userinfo
 */
@TableName(value ="userinfo")
@Data
public class Userinfo implements Serializable {
    /**
     * 主键
     */
    @TableId(type = IdType.AUTO)
    private Long id;
    /**
     * 用户名
     */
    private String username;
    /**
     * 密码
     */
    private String password;
    /**
     * 身份证号
     */
    private String idCard;
    /**
     * 真实姓名
     */
    private String realName;
    /**
     * 性别
     */
    private String gender;
    /**
     * 地址
     */
    private String address;
    /**
     * 手机号
     */
    private String phone;
    /**
     * 角色
     */
    private String role;
    /**
     * 年龄
     */
    private String age;
    /**
     * 状态
     */
    private String userStatus;
    /**
     * 更新时间
     */
    private Date updateTime;
    /**
     * 创建时间
     */
    private Date createTime;
    /**
     * 是否删除(0-未删, 1-已删)
     */
    private Integer isDeleted;
    @TableField(exist = false)
    private static final long serialVersionUID = 1L;
    @Override
    public boolean equals(Object that) {
        if (this == that) {
            return true;
        }
        if (that == null) {
            return false;
        }
        if (getClass() != that.getClass()) {
            return false;
        }
        Userinfo other = (Userinfo) that;
        return (this.getId() == null ? other.getId() == null : this.getId().equals(other.getId()))
            && (this.getUsername() == null ? other.getUsername() == null : this.getUsername().equals(other.getUsername()))
            && (this.getPassword() == null ? other.getPassword() == null : this.getPassword().equals(other.getPassword()))
            && (this.getIdCard() == null ? other.getIdCard() == null : this.getIdCard().equals(other.getIdCard()))
            && (this.getRealName() == null ? other.getRealName() == null : this.getRealName().equals(other.getRealName()))
            && (this.getGender() == null ? other.getGender() == null : this.getGender().equals(other.getGender()))
            && (this.getAddress() == null ? other.getAddress() == null : this.getAddress().equals(other.getAddress()))
            && (this.getPhone() == null ? other.getPhone() == null : this.getPhone().equals(other.getPhone()))
            && (this.getRole() == null ? other.getRole() == null : this.getRole().equals(other.getRole()))
            && (this.getAge() == null ? other.getAge() == null : this.getAge().equals(other.getAge()))
            && (this.getUserStatus() == null ? other.getUserStatus() == null : this.getUserStatus().equals(other.getUserStatus()))
            && (this.getUpdateTime() == null ? other.getUpdateTime() == null : this.getUpdateTime().equals(other.getUpdateTime()))
            && (this.getCreateTime() == null ? other.getCreateTime() == null : this.getCreateTime().equals(other.getCreateTime()))
            && (this.getIsDeleted() == null ? other.getIsDeleted() == null : this.getIsDeleted().equals(other.getIsDeleted()));
    }
    @Override
    public int hashCode() {
        final int prime = 31;
        int result = 1;
        result = prime * result + ((getId() == null) ? 0 : getId().hashCode());
        result = prime * result + ((getUsername() == null) ? 0 : getUsername().hashCode());
        result = prime * result + ((getPassword() == null) ? 0 : getPassword().hashCode());
        result = prime * result + ((getIdCard() == null) ? 0 : getIdCard().hashCode());
        result = prime * result + ((getRealName() == null) ? 0 : getRealName().hashCode());
        result = prime * result + ((getGender() == null) ? 0 : getGender().hashCode());
        result = prime * result + ((getAddress() == null) ? 0 : getAddress().hashCode());
        result = prime * result + ((getPhone() == null) ? 0 : getPhone().hashCode());
        result = prime * result + ((getRole() == null) ? 0 : getRole().hashCode());
        result = prime * result + ((getAge() == null) ? 0 : getAge().hashCode());
        result = prime * result + ((getUserStatus() == null) ? 0 : getUserStatus().hashCode());
        result = prime * result + ((getUpdateTime() == null) ? 0 : getUpdateTime().hashCode());
        result = prime * result + ((getCreateTime() == null) ? 0 : getCreateTime().hashCode());
        result = prime * result + ((getIsDeleted() == null) ? 0 : getIsDeleted().hashCode());
        return result;
    }
    @Override
    public String toString() {
        StringBuilder sb = new StringBuilder();
        sb.append(getClass().getSimpleName());
        sb.append(" [");
        sb.append("Hash = ").append(hashCode());
        sb.append(", id=").append(id);
        sb.append(", username=").append(username);
        sb.append(", password=").append(password);
        sb.append(", idCard=").append(idCard);
        sb.append(", realName=").append(realName);
        sb.append(", gender=").append(gender);
        sb.append(", address=").append(address);
        sb.append(", phone=").append(phone);
        sb.append(", role=").append(role);
        sb.append(", age=").append(age);
        sb.append(", userStatus=").append(userStatus);
        sb.append(", updateTime=").append(updateTime);
        sb.append(", createTime=").append(createTime);
        sb.append(", isDeleted=").append(isDeleted);
        sb.append(", serialVersionUID=").append(serialVersionUID);
        sb.append("]");
        return sb.toString();
    }
}
UserMapper
public interface UserinfoMapper extends BaseMapper {
}
UserinfoServiceImpl
@Service
public class UserinfoServiceImpl extends ServiceImpl
    implements UserinfoService{
}
UserinfoService
public interface UserinfoService extends IService {
}
SpringBootVueApplication
@SpringBootApplication
@MapperScan("com.f.springbootvue.mapper")
public class SpringBootVueApplication {
    public static void main(String[] args) {
        SpringApplication.run(SpringBootVueApplication.class, args);
    }
}
8、最后
启动前后端项目,然后就能的到一个巨丑无比的表格,表格中的数据就是数据库中的数据。后续的简单的CRUD操作,可以直接使用mybatis plus提供的方法即可。
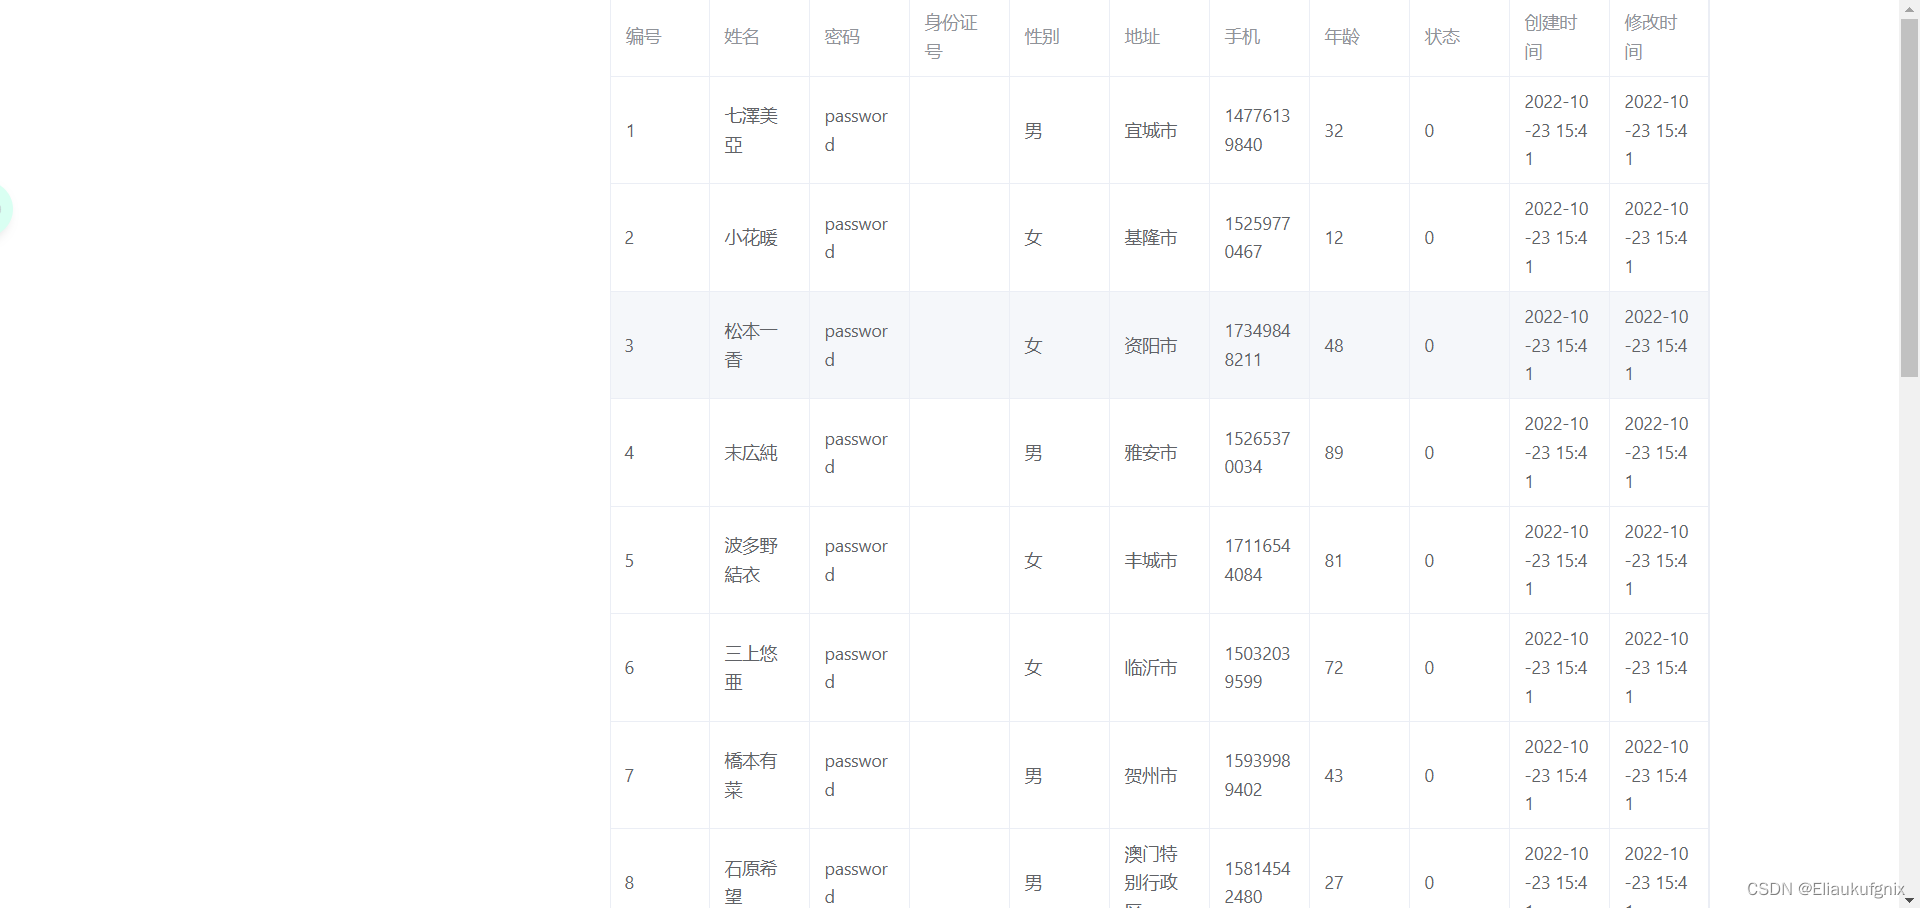
至此简单的前后端数据算是绑定在一起了,可以进行其他的操作了。
9、推荐一个github上的项目供学习参考
这里推荐一个后台管理的前后端项目。
项目地址:vue-element-admin
项目文档也非常的齐全,可供学习参考。
")
")
")

还没有评论,来说两句吧...